Interior Painting in Ancaster: Older Home Prep and Clean Finishes
Updated June 16, 2026
An Ancaster homeowner guide to interior painting in older and renovated homes, including drywall repair, trim, ceilings, primer, sheen, and quote planning.
- Trusted since 2005
- Fully insured
- Dust-controlled sanding
- Paint-ready finishing
- 3-year workmanship warranty
Quick Answer
Interior painting in Ancaster should start with a careful surface review, especially in older or previously renovated homes. The quote should cover cracks, old patching, trim gaps, stains, primer, ceiling condition, sanding, caulking, finish coats, and whether repairs are included before paint.
If you are comparing interior painting Ancaster, the best painter is not just the one who can start soon or name a colour quickly. A proper result depends on wall repair, ceiling prep, trim condition, primer, paint sheen, protection, and how clearly the quote explains the work. EPF Pro Services handles interior painting services for homeowners who want the surface prepared correctly before the finish coat goes on.
Ancaster painting projects often involve a mix of older surfaces, renovated rooms, newer drywall, existing trim, ceiling repairs, and previous paint layers. That mix can produce a beautiful result, but only if the surface is prepared honestly. A quick repaint over cracked corners, old patches, glossy trim, or ceiling stains usually does not stay looking clean for long.
The goal of this guide is to help you compare interior painting quotes in Ancaster without getting trapped by vague language. Many painting pages talk about fast crews, free estimates, clean work, colour help, residential painting, commercial painting, trim, cabinets, and low-disruption service. Those points matter, but they do not answer the question that decides the final look: what exactly happens to the walls, ceilings, trim, and repairs before paint is applied?
Quick answer for interior painting Ancaster
Interior painting in Ancaster should start with a careful surface review, especially in older or previously renovated homes. The quote should cover cracks, old patching, trim gaps, stains, primer, ceiling condition, sanding, caulking, finish coats, and whether repairs are included before paint.
| Quote item | Why it matters in Ancaster | What to confirm before booking |
|---|---|---|
| Wall and ceiling prep | Paint will not hide dents, tape lines, old roller texture, or drywall patch edges. | Filling, sanding, spot priming, and repair scope. |
| Trim, doors, and baseboards | Fresh walls make worn trim, open caulk lines, and old nail holes more obvious. | Whether trim painting, caulking, filling, and sanding are included. |
| Primer and sheen | Different rooms need different durability, washability, and reflection control. | Primer type, finish coats, sheen, and rooms with moisture or high traffic. |
| Protection and cleanup | Occupied homes, condos, and finished floors need slower setup and daily cleanup. | Furniture protection, floor masking, dust control, and handoff expectations. |
How to compare local painting quotes in Ancaster
When you compare painters, ask each company to separate painting from preparation. A quote that says "two coats on walls" is not the same as a quote that includes floor protection, furniture protection, drywall repairs, sanding, caulking, primer, trim prep, ceiling touch-ups, and cleanup. The finish coat is only the visible final step. The work underneath decides whether the room looks clean after daylight, lamps, and furniture are back in place.
A complete interior painting quote should name the rooms, surfaces, paint system, sheen, number of coats, primer needs, trim scope, ceiling scope, wall repair scope, access notes, and exclusions. If a room has old nail holes, peeling caulk, shiny patches, water stains, dents from furniture, settlement cracks, or old drywall patches, those items should not be hidden behind the phrase "minor prep." The homeowner should know what is included before the first drop cloth is opened.
Fast painting can be valuable, especially when a family needs rooms back quickly. Speed becomes a problem only when it compresses drying time, skips repair, or leaves surfaces partly inspected. A strong crew plans the work so the room is protected, repairs have time to dry, primer can seal the surface, and the final coat has a clean base. That is different from simply adding more people and hoping the paint hides the problems.
The best comparison question is simple: after the job is complete, what surface problems are still my responsibility? If the answer is unclear, the quote is not ready. A good contractor is comfortable explaining what will be repaired, what will be painted as-is, what needs a separate line item, and what may only be confirmed after furniture is moved or the first coat reveals hidden flaws.
Prep work matters more than most homeowners expect
Interior painting is surface finishing. Paint changes colour, sheen, and protection, but it does not flatten a wall, rebuild a corner, tighten loose tape, hide a bad patch, or remove caulk ridges. In many homes, the biggest visual improvement comes from the prep stage: filling dents, feathering patch edges, sanding rough spots, spot priming repairs, cleaning greasy areas, and cutting old caulk before new lines are made.
Walls should be checked under normal room light and, where possible, side light. Side light matters because it reveals ridges and patch edges that front light can hide. This is especially important in rooms with long sightlines, stairwells, hallways, large windows, pot lights, or darker paint colours. A painter who only looks straight at the wall may miss defects that become obvious once the room is finished.
If the room has visible dents, tape bubbles, cracks, or patch lines, plan the repair before paint. EPF can connect the painting scope with drywall repair before painting so the surface is paint-ready instead of simply covered. For a deeper explanation, see our guide on why drywall patches show through paint.
Prep also includes protection. A careful setup protects floors, stairs, cabinets, railings, built-ins, counters, switches, outlets, and furniture. Protection is not just cleanliness. It lets the crew work with better control because surfaces are masked, tools are organized, and the room has a clear workflow. In occupied homes, that daily setup and cleanup can be the difference between a manageable project and a frustrating one.
Walls, ceilings, trim, and doors are different surfaces
A strong interior painting scope should treat walls, ceilings, trim, doors, and frames as different surfaces. They need different prep, paint type, sheen, and application rhythm. Walls often need patching and wide sanding. Ceilings need flat paint, clean edges, and careful inspection around lights, vents, stains, and previous repairs. Trim and doors need caulking, filling, sanding, and a harder wearing finish than most walls.
Ceilings deserve special attention because they show problems differently than walls. A ceiling with old water staining needs the source understood before cosmetic work, then a proper stain-blocking primer where appropriate. A ceiling with repaired cracks, old texture, or patch marks may need more than a quick coat of ceiling paint. If the ceiling is being painted after popcorn removal, drywall repair, pot light changes, or a leak repair, it should be checked as a finishing surface, not treated as an afterthought.
Trim can make or break a freshly painted room. New wall paint draws attention to baseboards, door casing, window trim, open mitres, nail holes, peeling caulk, and old brush marks. If the trim is being repainted, the quote should include sanding, cleaning, filling nail holes, caulking open gaps, and applying a finish that can handle cleaning. If baseboards are damaged or outdated, it may be smarter to coordinate painting with <a href="/services/baseboard-installation/" class="text-blue-600 font-semibold hover:underline">baseboard installation and trim finishing</a> instead of repainting rough trim that still looks tired.
Doors and frames need a plan too. They collect hand oils, scuffs, hinge marks, roller texture, and edge wear. A rushed coat over a dirty or glossy door can lead to poor adhesion or visible brush marks. Door painting may require cleaning, deglossing, sanding, primer, careful drying time, and a different finish than the walls. That scope should be clear before the job starts.
Interior painting cost factors in Ancaster
Interior painting cost depends on more than room count. The biggest factors are room size, ceiling height, number of colours, wall condition, ceiling condition, trim and door scope, furniture, access, primer needs, number of finish coats, and how much cleanup and protection are required. A room that looks simple in a photo may take longer if it has many corners, built-ins, stair openings, high walls, dark colour changes, or several repairs.
Colour changes can affect cost because deep colours, bright colours, and sharp contrast changes may need primer or extra coats. Going from dark to light is different from refreshing a similar neutral. Painting over glossy, stained, greasy, or patched areas can also change the system. Kitchens, bathrooms, laundry areas, stairwells, and high-traffic hallways need paint choices that make sense for cleaning, moisture, and wear.
Occupied homes usually take more time than empty homes. Furniture has to be moved or protected, rooms may need to stay usable, and the crew may need to sequence the work around family routines. A vacant house or pre-move project can often move faster because the work area is open. That does not mean occupied homes are a problem; it means the quote should price the protection and sequencing honestly.
A low quote may be fine for a simple repaint with clean walls and no trim scope. It becomes risky when it does not explain repairs, primer, caulking, ceilings, doors, or cleanup. Homeowners should compare what is included, not just the final number. The cheapest quote can become the expensive quote if patch lines flash, trim looks old beside new walls, or the painter asks for change orders after the job starts.
Paint sheen, primer, and finish quality
Sheen is not just a style choice. It affects washability, reflection, patch visibility, and how forgiving the wall looks under light. Flat and matte finishes hide surface defects better but may be less washable depending on product. Eggshell and low-sheen finishes are common for living areas and bedrooms. Satin or pearl finishes can work in higher traffic or moisture-prone rooms, but they also reveal more wall defects. Trim and doors usually need a tougher finish than the walls.
Primer should be used where the surface needs it, not skipped because the paint claims strong coverage. Raw drywall compound needs primer. Stains often need a stain-blocking approach. Colour changes may need tinted primer. Glossy or problem surfaces may need bonding primer. If a wall has several patch repairs, primer helps reduce flashing and creates a more consistent base for finish coats.
A professional finish also depends on cut lines, wet edge control, roller direction, drying time, and final inspection. Clean cut lines around ceilings, trim, windows, and doors require patience. Large walls need consistent coverage so lap marks do not show. Fresh paint should be inspected after drying, not only while wet. A room can look complete while the paint is still flashing, then show missed issues once the sheen settles.
Ancaster homeowner notes: what changes the painting plan
Older homes and renovated spaces can have mixed surfaces. One wall may be newer drywall while another has older repairs, previous texture, or several coats of paint. Those surfaces absorb primer and finish coats differently, so the painting plan should account for them instead of treating every wall as identical.
Cracks should be understood before they are covered. Small cosmetic cracks, old settlement lines, or failed tape seams may each need a different repair. Paint alone will not stop a moving crack. The quote should explain whether the crack is being filled, taped, skimmed, or left as an existing condition.
Older trim can be one of the biggest visual challenges. Thick paint buildup, open caulk lines, old nail holes, dents, and uneven profiles need cleaning, sanding, filling, and careful cutting. If trim is not included, the homeowner should know that new wall paint may make the old trim stand out.
Ceiling stains and past water marks need careful handling. The source should be addressed first, then the stained area may need a proper primer before ceiling paint. Painting directly over a stain can allow discoloration to return through the finish.
Ancaster projects may also involve rooms added or renovated at different times. A clean painting scope should identify which rooms need deeper wall repair, which rooms need only a refresh, and where trim or ceiling painting should be separated as its own line item.
What to send for an accurate painting quote
For a clearer quote, send wide photos of every room, close photos of damaged walls, photos of ceilings, trim, doors, windows, stair areas, and any stains or cracks. Add approximate room sizes, ceiling height, number of rooms, whether ceilings are included, whether trim and doors are included, whether furniture can be moved out, and whether the home is occupied or vacant.
Mention any recent work that affects the paint: drywall repair, wallpaper removal, popcorn ceiling removal, new baseboards, flooring, electrical changes, plumbing repairs, water leaks, cabinet work, or pot light installation. Paint is usually near the end of the renovation sequence, so timing matters. Final painting should happen after dusty or damaging work whenever possible, but before final staging or deep cleaning.
If you are unsure about colour or sheen, send photos of the room in daylight and evening light. A painter cannot choose your taste for you, but photos help identify whether the room has strong side light, moisture, high traffic, dark trim, stained ceilings, or patch-heavy walls. Those details affect the technical scope even before colour is chosen.
How EPF Pro Services builds a cleaner painting scope
EPF Pro Services approaches interior painting as a finish system, not just a colour change. We look at the surface first: drywall patches, dents, sanding marks, ceiling stains, caulk gaps, trim condition, primer needs, and how the room will be used. The aim is a clean, durable finish that makes sense for real homes, not a rushed coat that looks good only until daylight exposes the surface.
The advantage of EPF's service mix is that painting can be coordinated with drywall repair, popcorn ceiling removal, smooth ceiling refinishing, baseboard installation, and wall preparation. That matters because many paint problems start before the paint can is opened. When the repair and finishing steps are planned together, the final room has a better chance of looking consistent.
If you are planning interior painting Ancaster, start with our interior painting service page and send photos through the EPF quote form. Include the rooms, surfaces, repair needs, timing, and whether the home is occupied. We can help confirm whether you need a simple repaint, deeper wall prep, trim work, ceiling painting, or drywall repair before finish coats.
FAQ
What makes interior painting in older Ancaster homes different?
Older or renovated homes can have mixed surfaces, old patches, cracks, trim buildup, stains, and previous paint layers. Those conditions need review before painting.
Can paint hide cracks in older walls?
Paint can change colour, but it will not properly repair cracks. Cosmetic cracks may need filling or taping, while active movement may need a different repair approach.
Should old trim be painted or replaced?
If trim is structurally sound, it may only need sanding, filling, caulking, primer, and paint. If it is badly damaged or mismatched, replacement may be the cleaner option.
Do ceiling stains need primer before paint?
Usually yes, after the source is understood. Stains can bleed through standard ceiling paint if they are not sealed correctly.
What should I send for an Ancaster painting quote?
Send photos of each room, close-ups of cracks, trim, stains, ceilings, and old patches, plus room sizes, ceiling height, furniture notes, and timing.
Painting service pages and guides
Plan the Right Painting Service Next
interior painting services
Main EPF service page for walls, ceilings, trim, doors, prep, primer, and finish coats.
drywall repair before painting
Repair service for dents, cracks, tape lines, patch edges, and ceiling stains before paint.
baseboard installation and trim finishing
Useful when painting is part of a larger room refresh with new or damaged trim.
why drywall patches show through paint
Related guide on flashing, patch edges, primer, sanding, and paint-ready drywall repair.
request an interior painting quote
Send photos, room sizes, repair needs, timing, and preferred finish level.
drywall repair before painting
Repair dents, cracks, tape lines, stain areas, and visible patch edges before paint.
baseboard installation and trim finishing
Coordinate trim, baseboard, caulking, and paint-ready finishing with room painting.
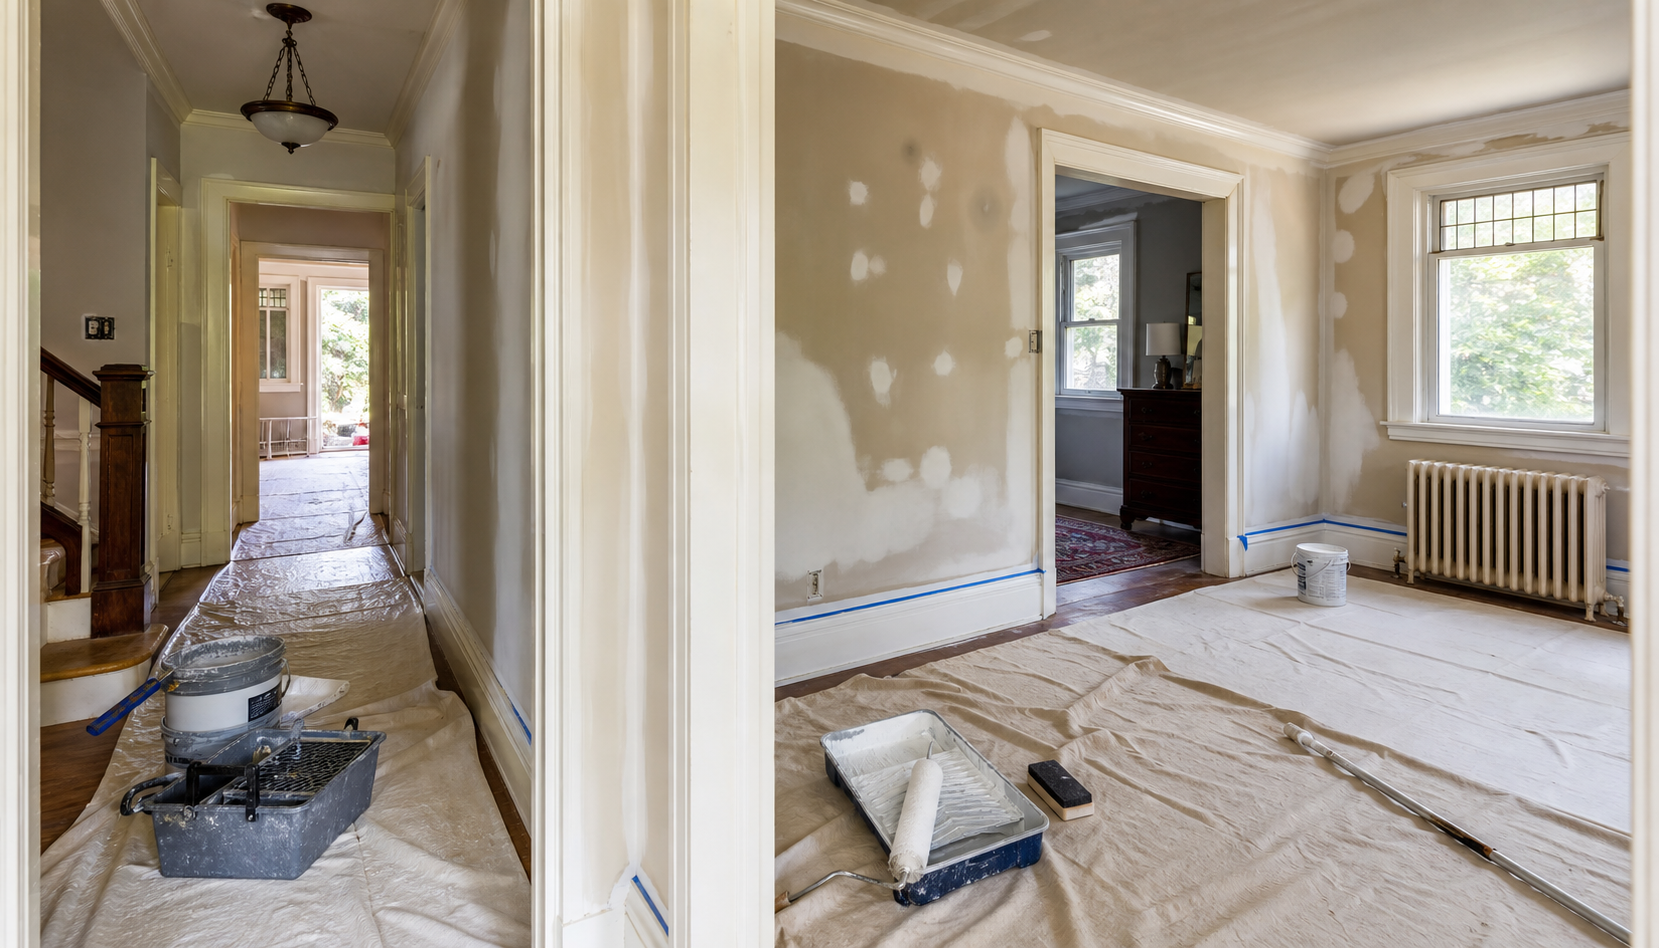
Field Photos
What the Work Can Look Like


Article Review
AuthorAlex - EPF Pro Services
Reviewed byEPF Pro Services
UpdatedJune 16, 2026
Plan your painting scope
Get an interior painting quote today
Share room photos, close-ups of wall damage, trim and ceiling photos, surfaces included, and timing. We reply with Ancaster interior painting availability and a clearer written scope.
Quick next step