Ceiling Leak Repairs Before Smooth Ceiling Finishing
2026-05-10
How leak-damaged ceilings are repaired before skim coating, stain-blocking primer, flat paint, or popcorn ceiling removal.
Quick Answer
How leak-damaged ceilings are repaired before skim coating, stain-blocking primer, flat paint, or popcorn ceiling removal.
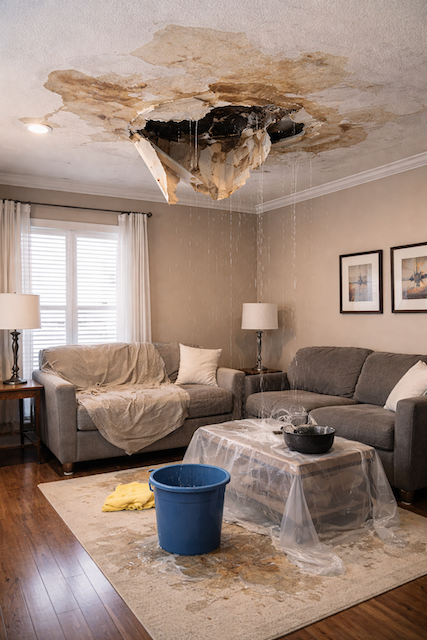
Ceiling leak repairs should be handled before any smooth ceiling finishing, popcorn removal, primer, or paint. A stain on the ceiling is usually the visible part of a larger sequence: water entered, drywall absorbed moisture, tape or compound may have softened, and the surface changed. Painting over that stain without understanding the damage can leave the homeowner with bubbling paint, recurring marks, sagging drywall, or a patch that fails after the room looks finished.
The first step is not compound. It is confirming the leak source has been fixed. Roof leaks, plumbing leaks, bathroom overflows, condensation, appliance lines, and upstairs drain issues can all mark a ceiling. If the source is not corrected, the ceiling repair is temporary. A professional finish can only last when the moisture problem is already solved and the material has had time to dry.
For local patching, ceiling repairs, and paint-ready drywall work, see our drywall repair service. If the repair is part of a larger ceiling upgrade, compare it with our popcorn ceiling removal process.
How to decide whether ceiling drywall can stay
Not every water stain means the drywall must be replaced. Some stains are surface-level after a short leak that dried quickly. Other leaks damage the board enough that patching over it is not responsible. The decision depends on softness, sagging, crumbling edges, mould concerns, repeated moisture, tape failure, and whether the ceiling has lost strength. If the board moves, flakes, smells musty, or has been soaked more than once, replacement becomes more likely.
A contractor should inspect the ceiling under good light and with the room protected. They may press gently around the damaged area, look for loose tape, check the surrounding texture or paint, and ask how long the leak lasted. Homeowners should share what caused the leak, when it happened, and whether the area has fully dried. That information changes the repair method.
Why stain-blocking primer matters
Water stains can bleed through regular paint. Even if the ceiling looks better after a coat of flat white paint, yellow or brown marks can reappear as the finish dries or as humidity changes. Stain-blocking primer is designed to seal the discoloration before the final paint. Skipping that step is one of the most common reasons ceiling leak repairs look good for a week and then start showing again.
Primer is not a substitute for repair. If drywall is loose or compound is failing, stain-blocking primer will not make the ceiling sound. The proper order is dry the area, repair or replace damaged drywall, tape and compound the patch, sand, prime with the right product, inspect, and then apply flat ceiling paint. Each step solves a different problem.
Why smooth ceilings make repairs more demanding
A textured ceiling hides small flaws. A smooth ceiling does not. When a leak repair sits in the middle of a smooth ceiling, the patch must be feathered wide enough to disappear under natural light and pot lights. A tight square patch can look acceptable from directly below but show a ridge from across the room. That is why ceiling patches often need broader blending than wall patches.
If the ceiling already has popcorn texture, the homeowner has two choices. One is to repair the damaged area and try to match the texture. The other is to use the repair as the right time to remove the texture and finish the whole ceiling smooth. Matching old popcorn can be difficult because age, paint, dust, and previous repairs change the texture. A smooth finish may be cleaner when the ceiling already looks patched or dated.
How a leak repair connects to popcorn removal
Leak damage often exposes the weakness of an old textured ceiling. The stained area may be darker, the texture may loosen, or previous repairs may become obvious. Once a contractor starts working on that area, it can be hard to make one small section blend into the rest of the ceiling. That is why many homeowners ask about removing the popcorn from the whole room instead of trying to hide one repair.
If popcorn removal is added, the scope grows. The crew may need to test the ceiling, protect the room, remove or encapsulate texture, repair damaged drywall, skim coat the full ceiling, sand with dust control, prime, and paint. That is a different project from a small leak patch, but it may produce a better visual result if the ceiling is a main living area.
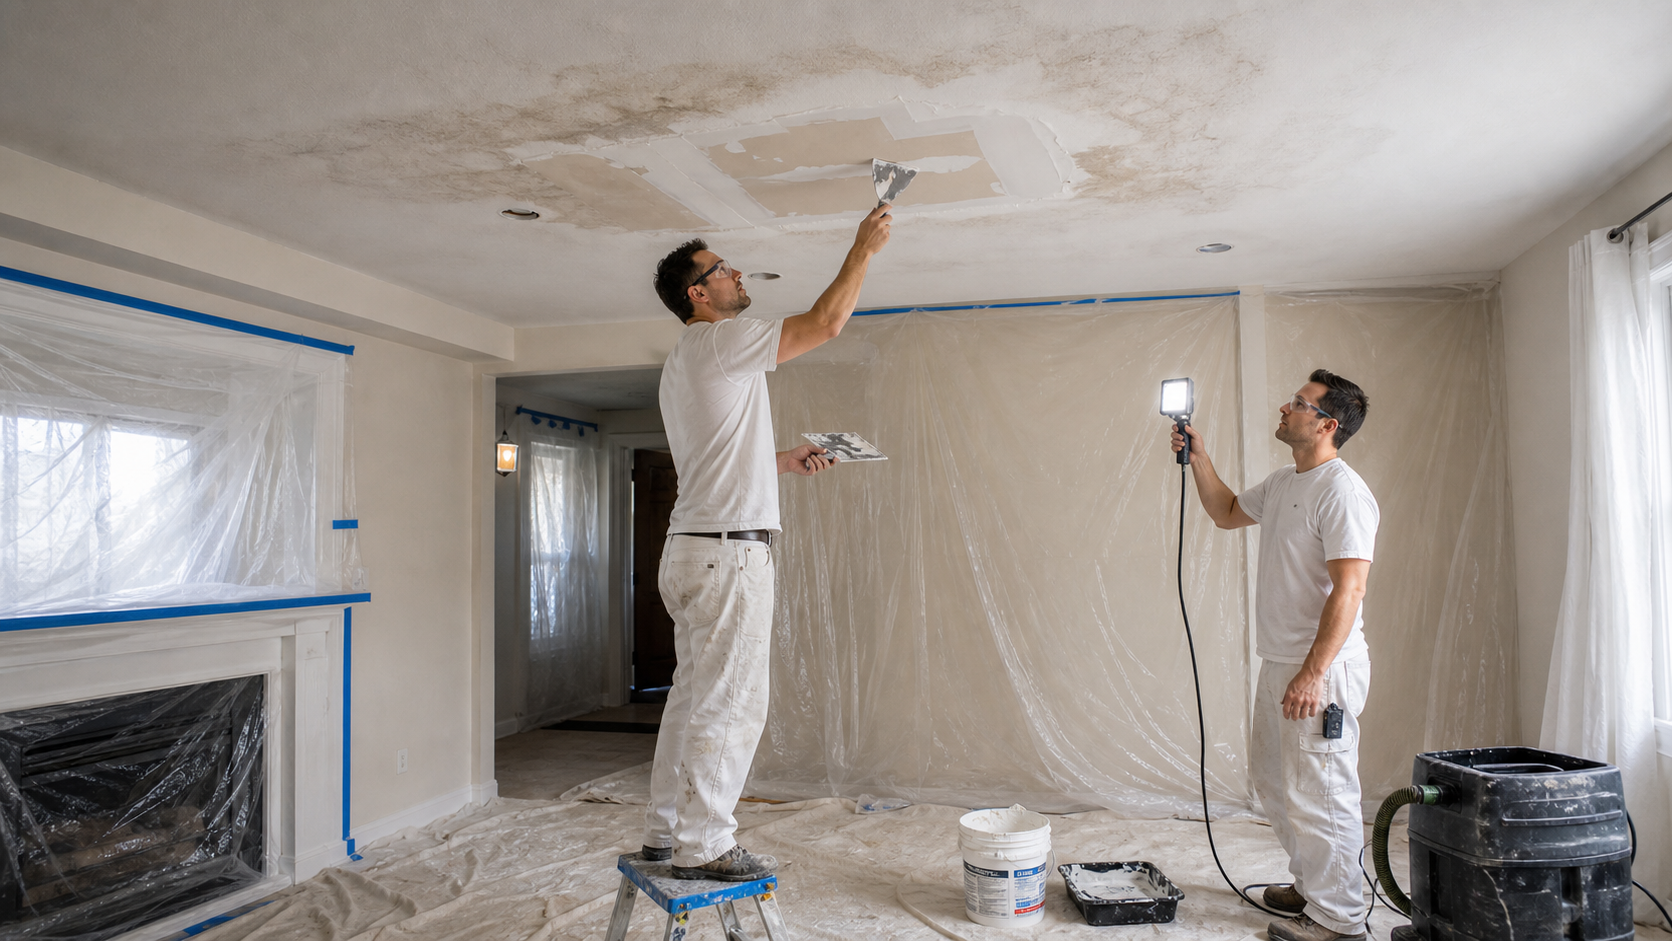
What a proper ceiling leak repair sequence looks like
A clean sequence starts with stopping the leak and drying the area. Next comes inspection. If replacement is needed, the damaged drywall is cut out cleanly, new board is installed, seams are taped, and compound is applied in multiple coats. If replacement is not needed, loose material is removed, the area is sealed as needed, compound is feathered, and the patch is sanded smooth.
After sanding, the contractor should inspect under light. Ceiling repairs often look different in daylight than they do under a work light. Once the patch is acceptable, stain-blocking primer is applied where needed. Then the ceiling is painted, usually with flat ceiling paint because it reduces glare and helps minor surface differences read less harshly. On a smooth ceiling, paint quality still depends on the repair underneath.
What affects the cost of a ceiling leak repair
Cost depends on access, size, ceiling height, whether drywall must be replaced, whether the ceiling is textured or smooth, whether primer and painting are included, and whether the room needs protection. A small stain in a low ceiling is not the same as a large damaged area over a stairwell or kitchen. If the repair touches popcorn texture, cost may also depend on whether matching, removal, or skim coating is chosen.
Painting can be a larger part of the job than homeowners expect. A spot repair may require painting the whole ceiling plane so the finish matches. Old flat paint, smoke exposure, sunlight, and age can make small touch-ups visible. If the ceiling connects through an open-concept area, the contractor should explain where the paint will stop and why.
For pricing context around patch size, access, sanding, primer, and paint, read our drywall repair cost in Mississauga guide.
Common mistakes homeowners should avoid
The first mistake is painting too soon. The ceiling may feel dry on the surface while moisture remains deeper in the board or insulation above. The second mistake is using regular paint over a stain without primer. The third mistake is patching only the smallest visible spot when the surrounding drywall has softened. The fourth mistake is underestimating how wide a ceiling repair needs to be feathered to disappear.
Another mistake is ignoring the rest of the ceiling. If the room has old popcorn texture, multiple stains, pot-light patches, or visible seams, one small repair may not solve the visual problem. In that case, a full smooth-ceiling finish may be more logical than repeated spot repairs. The right answer depends on the room, the budget, and how finished the ceiling needs to look.
When to bring in a professional
Small cosmetic stains may look simple, but ceilings are less forgiving than walls. Working overhead is slower, sanding dust falls everywhere, and bad feathering is easy to see. A professional is worth considering when the drywall is soft, the stain is large, the ceiling is textured, the repair is in a main room, the area needs primer and repainting, or the leak affected electrical fixtures, pot lights, or vents.
A professional should also be clear about what is outside their scope. If there is active plumbing, roofing, mould remediation, or electrical work, those issues need the right trades. Drywall and painting should happen after the cause is resolved. Good sequencing protects the homeowner from paying twice.
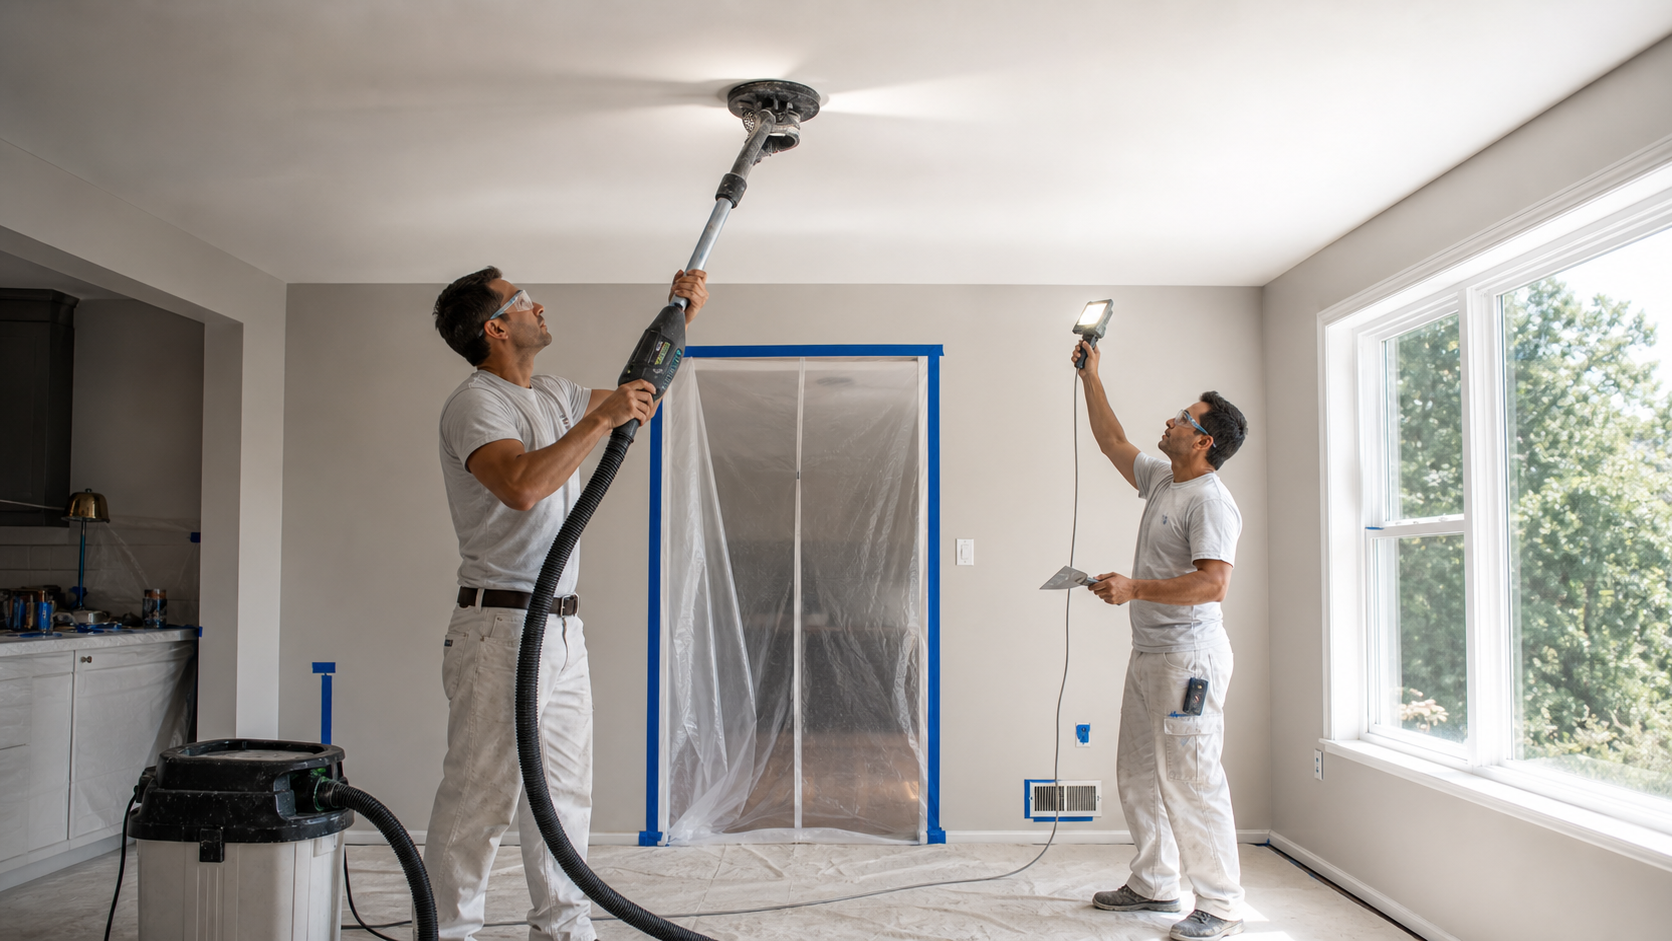
How to protect the room during ceiling leak repair
Ceiling repair still needs protection even when the damaged area looks small. Compound can drop, sanding dust can spread, and primer can splatter if the work is overhead. Floors, furniture, lights, and nearby walls should be protected before cutting, scraping, or sanding starts. If the repair is in a kitchen or living room, nearby cabinets, counters, sofas, and electronics need more attention than an empty basement ceiling.
If the leak happened above a finished room, the repair may also involve insulation, vapour barrier, or access from the floor above. That does not mean every ceiling repair is major, but it does mean the contractor should not price only the visible stain. The repair should consider what is behind or above the drywall, especially if the leak was active for more than a short period.
Why old popcorn texture complicates leak repairs
Water-damaged popcorn texture can loosen around the stain and stay weak beyond the visible mark. When the contractor starts scraping or priming, more texture may release. If the texture has been painted, the damaged area may peel in sheets or tear the drywall paper underneath. This is why leak repairs on popcorn ceilings often become larger than the original stain suggests.
Matching the texture is another challenge. Fresh texture rarely blends perfectly with old texture that has been painted, yellowed, collected dust, or been repaired before. In secondary rooms, a small mismatch may be acceptable. In a living room, dining room, hallway, or room being prepared for sale, a full smooth-ceiling finish may be the cleaner long-term answer.
How repair timing affects painting
Drywall compound needs dry time. Primer needs dry time. Paint needs dry time. Rushing those steps can cause flashing, shrinkage, visible patch edges, or stains that return. A ceiling repair may look simple, but the schedule is often controlled by drying more than labour. This is especially true in humid weather, basements, bathrooms, or rooms with poor airflow.
If the ceiling is being repaired before a sale, a move-in, or a larger renovation deadline, build in enough time for proper drying and inspection. The best repair schedule leaves room for a second look after primer. Primer often reveals small defects that were not obvious in raw compound. Fixing those before the final paint is what makes the ceiling look intentional rather than patched.
When a leak repair should become a full ceiling refinish
A spot repair is not always the best value. If the ceiling has multiple stains, old popcorn texture, several pot-light patches, visible seams, or heavy natural light, repairing only the damaged area may leave the room looking uneven. In that situation, a full ceiling refinish can be more sensible. The crew repairs the damaged section first, then smooths the entire ceiling plane so the repair does not stand out.
This is common in main-floor rooms where the ceiling is part of the first impression. A living room with a single obvious patch can make the whole renovation feel unfinished. A full skim coat, primer, and flat ceiling paint can turn a leak repair into a cleaner visual upgrade. The decision depends on the room, budget, timeline, and how noticeable the existing texture or repair marks are.
How this supports the popcorn ceiling cluster
Leak repairs are part of the popcorn ceiling topic because many homeowners discover ceiling damage while planning texture removal. Others start with a leak and then realize matching the old popcorn texture will not look right. This guide gives those homeowners a clear bridge between drywall repair and smooth ceiling finishing. It supports the drywall repair service page and the popcorn ceiling removal page at the same time.
That makes it useful content rather than a random blog post. It explains when repair comes first, when primer matters, when popcorn removal makes sense, and why finishing the whole ceiling can sometimes be better than patching one spot. Those are real project decisions homeowners face before they request a quote.
For best results, photograph the leak area before repairs begin, keep notes about the leak source, and tell the contractor whether the stain has changed over time. That background helps separate a cosmetic mark from a moisture problem that still needs attention.
If the ceiling is being repaired as part of a larger renovation, complete the leak repair before final ceiling paint, wall paint, trim touch-ups, and cleanup. Otherwise, a hidden moisture issue can force rework after the room already looks finished.
A little extra planning at this stage protects the finish, the schedule, and the money already invested in the room and nearby finished living spaces.
Final takeaway for ceiling leak repairs
Ceiling leak repair is not just hiding a stain. It is a chain of decisions: fix the leak, dry the area, decide whether drywall can stay, repair or replace the damaged section, block stains, blend the patch, control dust, prime, and paint. If popcorn texture is involved, the homeowner also needs to decide whether matching texture or finishing the whole ceiling smooth makes more sense.
The best repair is the one that still looks right months later under real light. That requires patience, the right materials, and a finish plan that matches the room. If the ceiling is part of a larger update, handle the leak repair before the smooth-ceiling finish so the final result is clean, stable, and paint-ready.
Related local pages
popcorn ceiling removal — Main service page for removal, skim coating, sanding, primer, and painting.
drywall repair — Repair service for ceiling cracks, patches, leak damage, and paint-ready surfaces.
Mississauga popcorn ceiling removal — Local ceiling removal and smooth finishing page for Mississauga homeowners.
popcorn ceiling removal cost guide — Cost factors for painted texture, access, room size, repairs, primer, and paint.
drywall repair cost in Mississauga — Cost factors for patches, ceiling access, sanding, primer, and painting.
repairing water-damaged drywall — Broader drywall guide for leaks, moisture damage, and replacement decisions.
FAQ
Can I paint over ceiling water damage?
Only after the leak is fixed, the ceiling is dry, and the damaged area is properly sealed. Most stains need stain-blocking primer before flat ceiling paint.
When does ceiling drywall need replacement after a leak?
Replacement is usually needed when drywall is soft, sagging, crumbling, mouldy, or has been repeatedly saturated.
Can popcorn texture be matched after a ceiling leak?
Sometimes, but texture matching is difficult. If the ceiling already looks dated or patched, full removal and skim coating may look cleaner.
Field photos
Inspiration for your project
Drywall terms this page covers
Useful terms to compare scopes, finish levels, and scheduling before you book.
- ceiling leak repair before painting
- smooth ceiling repair after leak
- water stained ceiling drywall
- stain blocking primer ceiling
- ceiling patch before skim coat
Article Review
AuthorEPF Pro Services
Reviewed byEPF Pro Services
UpdatedMay 10, 2026
Plan your drywall scope
Get a drywall quote today
Share photos, room sizes, and timing. We reply the same day with GTA drywall availability and a clearer written scope.
• Clear finish-level scope and drywall sequencing
• Basements, ceilings, condos, and commercial buildouts
• Flexible scheduling for occupied homes, condos, and active sites
Quick next step
Send photos and room sizes through the main quote page, or call for a same-day reply.
Keeping the form on the main quote page helps this article stay lighter and faster.