Repairing Water-Damaged Drywall: Signs, Steps, and When to Replace It
2026-03-31
Learn the signs of water-damaged drywall, how to assess the damage, when repair is possible, and when replacement is the safer long-term choice.
Quick Answer
Learn the signs of water-damaged drywall, how to assess the damage, when repair is possible, and when replacement is the safer long-term choice.
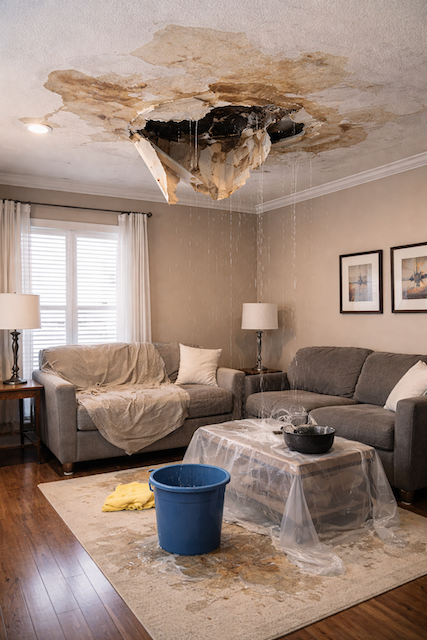
Water-damaged drywall is one of the most common repair issues homeowners run into after roof leaks, plumbing failures, bathroom moisture, condensation problems, appliance leaks, or basement dampness. At first the damage may look small. You might only notice a yellow stain, a slightly soft spot, or a little bubbling paint. But once drywall absorbs water, the problem can spread behind the surface faster than many homeowners expect.
That is why repairing water-damaged drywall is not just about covering the stain. The real job is figuring out whether the drywall is still structurally sound, whether hidden moisture is still present, whether insulation or framing was affected, and whether the damaged section should be repaired or replaced entirely.
If you are dealing with a leak, ceiling stain, bubbling paint, or soft drywall, start by comparing the situation against our professional drywall repair process for water-damaged walls, ceilings, and paint-ready finish restoration.
Why prompt repair matters
A lot of homeowners wait because the drywall still feels mostly firm or because the leak appears to have stopped. The risk is that the visible stain is often not the full problem. Moisture may still be sitting behind the wall, insulation may still be wet, or the drywall paper may already be weakening even if the room still looks usable.
Prompt repair matters for a few reasons. First, drywall loses integrity once it takes on enough water. Second, lingering moisture creates a better environment for odor, mold growth, and continued paint failure. Third, the longer damaged drywall sits in place, the more likely the repair grows beyond a simple wall patch and turns into a larger cut-out and rebuild.
In practical terms, fast action usually means a smaller repair scope, a better chance of stopping hidden damage, and a cleaner final result.
Common signs of water-damaged drywall
Water damage drywall problems do not always look dramatic at first. In many homes, the earliest signs are cosmetic. The challenge is that cosmetic signs often point to deeper trouble behind the surface.
- Yellow or brown staining on walls or ceilings
- Bubbling, peeling, or blistering paint
- Soft spots when the drywall is pressed lightly
- Swelling, sagging, or warping
- Tape joints that start to separate after moisture exposure
- Musty odors near the damaged area
- Reappearing damp spots after painting
- Visible mold or mildew on the paper face
A water-stained wall is especially easy to underestimate. Homeowners often think the issue is only cosmetic because the mark is flat and dry to the touch. But staining can remain even after the original leak slows down, and the drywall behind the paint may still be compromised.
What a proper drywall damage assessment should include
Before you decide whether to patch, dry, or replace, the first step is assessment. That means looking past the stain itself and understanding the extent of the moisture exposure.
A proper assessment usually starts with a visual review of the full affected area, including corners, trim lines, ceiling transitions, and the path the water may have followed downward. Then you check whether the drywall still feels firm or whether it has softened, swelled, or become crumbly.
The next question is hidden moisture. Even if the wall surface appears dry, that does not automatically mean the cavity is dry. If insulation, framing, or backing remains damp, closing the wall up too quickly can trap the problem.
That is also why ceilings and upper wall sections need extra caution. Water often travels before it shows itself. The stain you see may be lower than the leak source, or smaller than the area that actually needs to be opened and repaired.
Can water-damaged drywall be repaired, or does it need replacement?
This is usually the most important homeowner question, and the answer depends on severity. Some drywall after water damage can be repaired if the exposure was limited, the board dried fully, and the structure of the drywall stayed intact. But in many cases, replacement is the safer and cleaner long-term choice.
It may be repairable if
- The water exposure was brief and limited
- The drywall dried fully and stayed firm
- The damage is mostly staining or light surface paint failure
- There is no swelling, sagging, or paper breakdown
- There is no odor or evidence of mold in drywall
It usually needs replacement if
- The drywall feels soft, spongy, or crumbly
- The section is sagging or warped
- The paper face is breaking down or separating
- There is visible mold growth or persistent odor
- Insulation behind the drywall is wet
- The leak soaked the area rather than merely staining it
- The same damage keeps returning after cosmetic fixes
This distinction matters because trying to mud over weakened drywall rarely ends well. Even if the wall can be made to look better for a short time, the damage underneath often telegraphs back through paint or fails again later.
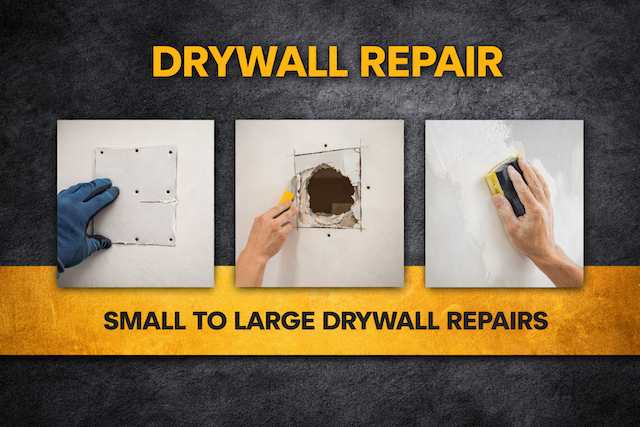
Step-by-step process for repairing water-damaged drywall
Once the source of water is addressed, a proper repair usually follows a sequence. Skipping steps is where many DIY wet drywall repair attempts go wrong.
1. Stop the source of water
No drywall repair should start until the leak, condensation problem, or moisture source is fixed. If you repair the wall first and the water issue continues, the new work may fail quickly.
2. Inspect the full affected area
Look beyond the visible stain. Check whether the damage extends higher, lower, or farther sideways than expected. This is especially important on ceilings, around plumbing lines, and near exterior walls.
3. Remove compromised drywall
Any soft, swollen, sagging, mold-affected, or broken-down drywall should be cut out rather than patched over. Trying to save badly weakened board usually creates a worse finish and a less stable repair.
4. Dry the cavity and surrounding structure
Before closing the wall again, the surrounding area needs to be dry. That includes framing, backing, and any adjacent materials affected by the leak path.
5. Replace wet insulation if needed
Wet insulation often cannot just be left behind the new patch. If it is still damp or degraded, it needs replacement before the drywall goes back on.
6. Install new drywall and finish the repair
Once the area is dry and sound, the repair moves back into standard drywall work: new board, secure fastening, taping, applying joint compound, feathering, sanding, priming, and painting so the repaired section blends with the surrounding wall or ceiling.
This last stage is where finish quality matters. A water damage repair can be structurally correct and still look poor if the cut-out, mudding, sanding, and paint preparation are rushed.
Why DIY water-damaged drywall repair often goes wrong
Water-damaged drywall is different from a standard hole or dent because the visible damage may not match the full extent of the moisture problem. Homeowners often make one of two mistakes: they repair too little, or they repair too soon.
Repairing too little means painting over stains, mudding over swelling, or spot-patching areas that should have been cut out. Repairing too soon means closing the wall before the cavity is fully dry or before the real water source is confirmed.
Other common mistakes include reusing wet insulation, ignoring musty odor, assuming a stain is purely cosmetic, or trying to save drywall that has already lost structure. Even when the wall looks better temporarily, those issues can come back as bubbling paint, joint failure, odor, or recurring stains.
If the wall is already damaged and you also want to avoid visible finish errors after the repair, our guide on mistakes to avoid when patching drywall is a useful second read.
Practical homeowner concerns most people miss
Homeowners are usually worried about the visible stain, but there are a few practical issues that matter just as much.
One is hidden moisture in walls. If the cavity is not dry, the new patch is starting over a problem that is still active. Another is insulation replacement. Wet insulation can hold moisture longer than expected, and leaving it behind can undermine the repair. Another is mold risk. If the affected drywall smells musty or shows visible growth, you are no longer dealing with a simple cosmetic stain.
Then there is finish quality. Water-damaged drywall repairs often happen in very visible places: ceiling lines, upper walls, stairways, finished basements, and living spaces. Those are not forgiving surfaces. If the cut-out is not blended well, the repair may still stand out even after the damage is structurally solved.
How to prevent future drywall water damage
Prevention is partly maintenance and partly fast response. Regularly check ceilings below bathrooms, around tubs and showers, under roof transitions, near basement corners, and around plumbing fixtures. Small drips and slow leaks do not stay small for long once drywall starts absorbing moisture.
Good ventilation matters too. Bathrooms, laundry areas, and basements with higher humidity can create repeated moisture stress even without one major leak event. Proper airflow helps reduce recurring paint and drywall issues.
It also helps to keep gutters, downspouts, and exterior drainage working properly. A water-stained interior wall sometimes starts as an outside problem.
When it is worth calling a professional
It makes sense to call a pro when the drywall feels soft, the damage involves a ceiling, insulation is wet, mold may be present, the affected area is spreading, or you want the repair to blend cleanly after paint. It is also the safer choice when the same stain or bubbling keeps returning after someone already tried to cover it up.
Professional drywall repair helps most when you need both the moisture problem and the finish problem handled correctly. That means judging repair versus replacement accurately, opening the wall where necessary, rebuilding the damaged section cleanly, and finishing it so the room looks normal again instead of patched.
For most homeowners, that is the real value: not just covering damage, but solving it properly and getting back to a clean, paint-ready wall or ceiling.
Final thoughts
Repairing water-damaged drywall is not just about hiding stains. The real work is finding the full extent of the moisture, removing compromised material, drying the area properly, and deciding honestly whether the drywall can be repaired or should be replaced.
If the wall is firm, dry, and only lightly affected, a repair may be enough. If the drywall is soft, sagging, mold-affected, or still hiding moisture behind it, replacement is usually the safer long-term solution.
If you are dealing with a water-stained wall, bubbling paint, soft drywall, or ceiling damage after a leak, see our drywall repair services for water-damaged areas, seamless patching, and paint-ready restoration across the GTA.
Related local pages
Mistakes to avoid when patching drywall — Useful follow-up reading if you want to understand the finishing errors that make repairs stay visible.
FAQ
Can water-damaged drywall be repaired without replacing it?
Sometimes. If the drywall dried fully and stayed firm, and the damage is mostly cosmetic, repair may be possible. Soft, swollen, sagging, or mold-affected drywall usually needs replacement.
What are the signs of water-damaged drywall?
Common signs include stains, bubbling paint, soft spots, sagging, musty odor, recurring dampness, and visible mold or mildew.
Does wet insulation need to be replaced when drywall is repaired?
Often, yes. If insulation behind the drywall is wet, it usually needs to be removed and replaced after the cavity is dried properly.
Should I patch over a water stain on drywall?
Not until the water source is fixed and the drywall is confirmed dry and structurally sound. Patching over a stain without addressing the cause often leads to recurring damage.
When should I call a professional for water-damaged drywall repair?
Call a pro when the drywall feels soft, the damage is on a ceiling, mold may be present, insulation is wet, the damage is spreading, or you want the finished repair to blend cleanly after paint.
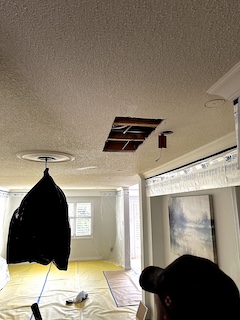
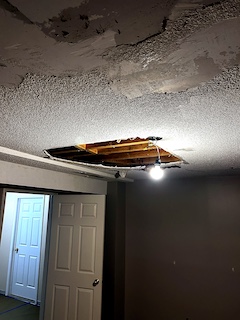
Field photos
Inspiration for your project
Drywall terms this page covers
Useful terms to compare scopes, finish levels, and scheduling before you book.
- repairing water-damaged drywall
- water-damaged drywall repair
- wet drywall repair
- signs of water-damaged drywall
- replace water-damaged drywall
- mold in drywall
- drywall repair after water damage
- professional drywall repair
Article Review
AuthorAlex - EPF Pro Services
Reviewed byEPF Pro Services
UpdatedMarch 31, 2026
Plan your drywall scope
Get a drywall quote today
Share photos, room sizes, and timing. We reply the same day with GTA drywall availability and a clearer written scope.
• Clear finish-level scope and drywall sequencing
• Basements, ceilings, condos, and commercial buildouts
• Flexible scheduling for occupied homes, condos, and active sites
Quick next step
Send photos and room sizes through the main quote page, or call for a same-day reply.
Keeping the form on the main quote page helps this article stay lighter and faster.