How to Prepare Your Home for Popcorn Ceiling Removal in Oakville
2026-04-06
Practical Oakville guide to popcorn ceiling removal preparation, including furnished vs vacant rooms, painted ceiling prep, dust containment, older-home considerations, and what happens after removal.
Popcorn ceiling removal is messy work by nature. Even with proper containment, the ceiling is still being disturbed overhead, tools move through the room all day, and repairs usually follow removal before the final smooth finish is ready for paint.
That is why preparation matters so much. The easier the room is to access and protect before work starts, the easier it is to control dust, reduce disruption, and produce a cleaner final result. Many Oakville homeowners think first about shifting a sofa or removing a few framed pictures, but good preparation goes well beyond that.
If you are planning the project now, start with our Oakville popcorn ceiling removal page. It covers the local service process, Oakville neighbourhood coverage, and what separates simple texture removal from a true paint-ready ceiling finish.
This guide is written for real Oakville properties, including Downtown Oakville condos, Glen Abbey family homes, Bronte and Old Oakville detached houses, River Oaks townhomes, and larger remodels in Clearview, College Park, Palermo West, and Kerr Village. The goal is simple: help you prepare the room properly so removal, repairs, sanding, and cleanup all run more smoothly.
Why proper preparation matters before popcorn ceiling removal
Preparation affects more than cleanliness. It affects access, production speed, repair quality, and whether the room can be turned back over efficiently once the ceiling work is done. When ladders can be set safely, tools can be staged properly, and fixtures can be protected without working around clutter, the job usually runs faster and the finishing work is more consistent.
It also reduces avoidable damage. Tight furniture layouts, exposed electronics, open vents, and cluttered floor paths make ceiling work harder than it needs to be. That creates more opportunities for dust drift, scuffs, or delays while the crew keeps stopping to clear space that should have been addressed before arrival.
In practical terms, proper popcorn ceiling removal preparation helps with all of the following:
- Better dust containment and easier cleanup after removal, sanding, or smoothing work
- Safer ladder placement and more reliable access across the full ceiling field
- Fewer delays caused by moving furniture during the job instead of before it
- Better drywall repairs and skim-coat work after the texture is removed
- Lower risk of damage to floors, built-ins, furniture, and adjacent finished spaces
Is the room vacant or furnished?
This question changes the prep plan immediately. A vacant bedroom in River Oaks is much easier to protect and finish than a furnished family room in Glen Abbey or an occupied condo living room near Kerr Village or Downtown Oakville.
1. Vacant rooms
Vacant rooms are always simpler. The crew can protect the floor wall-to-wall, set ladders where needed, and move from removal to repairs to sanding without constantly working around furniture. If the room is empty, the main prep focus is usually on protecting floors, masking adjoining openings, handling fixtures, and confirming whether the ceiling has been painted.
Even then, functionally vacant means truly workable. Boxes, renovation materials, storage bins, and spare furniture around the perimeter still block corners, closets, vents, and window walls where finish crews need access. The room does not need to be sterile, but it does need to be open enough that the crew can move around the entire ceiling safely and efficiently.
Open-concept areas should be judged the same way. If the ceiling runs across the kitchen, dining, and family room, clearing only one section may not be enough. The work zone still needs uninterrupted floor space so containment and finishing can be done properly across the full connected area.
2. Furnished rooms
Furnished rooms can still be done, but the prep needs to be more disciplined. Small items, breakables, electronics, and loose decor should be removed fully. Larger pieces like beds, sofas, sideboards, or dressers may sometimes stay only if they can be consolidated away from the work path and wrapped correctly.
The more floor area you clear, the better. In bedrooms, the bed may stay but nightstands, lamps, benches, mirrors, chairs, and small storage pieces should usually come out. In living rooms and main-floor family rooms, sectionals and media units are often the biggest problem because they block ladder placement exactly where ceiling access is needed.
For occupied Oakville homes with kids, pets, or evening routines built around the room, assume that anything delicate, valuable, or awkwardly shaped should be removed rather than simply covered in place. Plastic helps, but it is not a substitute for real clearance.
What homeowners should remove before the crew arrives
Many homeowners focus on the largest furniture first, but smaller room contents are usually what slow prep down and create avoidable risk. The goal is to leave the room easy to protect and easy to work in without stopping to sort personal or fragile items on site.
Before popcorn ceiling removal day, remove or relocate the following where possible:
- Wall decor, mirrors, framed art, clocks, and decorative shelving items
- Fragile decor, ceramics, glass pieces, and sentimental items
- Televisions, speakers, computers, gaming systems, printers, and other electronics
- Window coverings if they sit tight to the ceiling or interfere with edge access
- Small furniture such as accent tables, stools, desk chairs, toy bins, benches, and floor lamps
- Valuables, documents, jewelry, medications, and personal items you do not want left in the work area
- Pet beds, food bowls, litter boxes, cages, scratching posts, and toys
If a heavier piece is in question, ask before the job instead of guessing. Beds, upright pianos, hutches, oversized sectionals, and built-ins all affect staging differently. Some can stay if wrapped and isolated properly; some should be moved out before work starts so the finish crew is not boxed in later during repairs and sanding.
How to protect floors, walls, fixtures, and vents
Protection should be treated as a full system, not just one layer of drop sheets. Removal, smoothing work, and sanding each create different risks. Floors, trim, and nearby openings need to be handled according to the actual process being used.
Hardwood floors, common in many Oakville homes, usually need more stable protection than a light sheet because ladders, foot traffic, and compound buckets can shift basic coverings. Tile floors hold up well but still need protection so grout lines do not collect residue or fine sanding dust. Carpet traps debris easily, so careful coverage and edge sealing matter more than many homeowners expect.
Walls near the ceiling line may also need masking, especially if the room has fresh paint, wallpaper, detailed trim, custom millwork, or built-ins. In Oakville homes with higher-end finishes, that edge protection becomes more important, not less. The cleaner the room is before setup, the better the protection can be applied.
Fixtures and mechanical openings deserve their own checklist:
- Light fixtures should be removed or protected depending on how they sit to the ceiling
- Pot lights should be discussed before work starts because cutouts, trim rings, and future lighting plans can affect repairs and skim work
- Smoke detectors and alarms may need temporary handling or protection depending on placement
- HVAC vents should be sealed so dust does not move through the system
- Ceiling fans should be removed or isolated properly if they interfere with access
- Adjacent rooms and doorways should be considered if the layout is open or air movement carries dust farther than expected
This matters especially in Oakville homes with open main floors, cathedral sections, or connected kitchen-family room ceilings. Dust does not stop at one room line just because the flooring changes. If containment ignores adjacent openings, homeowners often notice the problem later in nearby rooms rather than in the active work zone.
Check the ceiling before removal starts
The ceiling condition changes the prep plan just as much as the room condition. Before work starts, it helps to walk the ceiling visually and note anything that could affect the method, the repair scope, or the schedule.
Look for stains, previous patches, cracks, sagging areas, loose tape joints, nail pops, exposed seams, and obvious height changes. Water marks near bathrooms, skylights, exterior wall lines, or second-floor plumbing routes matter because removal may expose repairs that need more than a basic patch. Old repairs hidden under the texture also tend to show up once the popcorn comes off.
It is also worth noting whether the ceiling runs into bulkheads, crown moulding, skylight wells, vaulted areas, plaster transitions, or older additions. Those details do not stop the project, but they do change setup time, hand-finishing needs, and edge work. High ceilings and stairwells obviously need to be identified before arrival so access equipment and scheduling are planned honestly.
If the texture already looks patchy or unusually hard, that can be an early clue that the ceiling has been painted or repaired more than once. In neighborhoods with mixed housing stock like Bronte, Old Oakville, College Park, and Clearview, that is not unusual. The ceiling history often changes the preparation and finishing strategy more than the square footage does.
Painted vs unpainted popcorn ceiling preparation
This is one of the most important distinctions on the whole page. Unpainted popcorn can sometimes be softened and removed in a more predictable way. Painted popcorn is different. Once paint seals the texture, scraping can become slower, rougher, and less reliable, and the ceiling underneath often needs more repairs to get back to a clean plane.
For homeowners, that means preparation is not only about covering furniture and floors. It is also about confirming expectations. A painted ceiling may need more time, more surface-smoothing work, more drying time, and a different work sequence than an unpainted one. That affects how long the room stays out of service and whether the project remains a removal job or becomes a broader resurfacing scope.
If you already know the texture has paint on it, read our painted popcorn ceiling removal guide next. It explains why painted ceilings often move from simple scraping into a more repair-heavy skim-coat process.
A good prep conversation should cover whether the ceiling has ever been painted, whether any test areas have been done, and whether the room schedule should allow for extra finishing passes. That is where many homeowners underestimate the job. Scraping is only one stage. Getting the ceiling smooth again is the part that actually decides whether the result looks good.
Older homes and asbestos considerations in Ontario
Older popcorn or textured ceilings in Ontario should not be treated casually. If the home is older and the material history is unclear, testing may be appropriate before the ceiling is disturbed. This is not just a technical detail. It can change the method, timing, containment requirements, and who should perform the work.
The practical rule for homeowners is simple: do not assume based on appearance alone. A ceiling can look ordinary and still justify a more careful decision before disturbance. That is especially relevant in older Oakville homes and additions where renovation history may be incomplete or undocumented.
If asbestos is suspected, the scope may shift from straightforward removal prep into a testing-and-planning step first. That affects room access, whether the space should be vacated longer, and how the project is scheduled. It is better to identify that question before furniture is moved and expectations are set than halfway through the job.
This article is not legal advice, and every property is different. The key point is that older ceilings deserve a safer assessment before disturbance, particularly when age, prior coatings, or material history are uncertain.
Plan for access, parking, and work sequence
A lot of delays on ceiling projects are logistical rather than technical. The crew still needs a clean entry path, somewhere to stage tools and protective materials, access to water, and a plan for how the room will be used while the project is underway. In condo settings, elevator bookings, loading rules, and protection requirements can matter as much as the ceiling itself.
Think through access before day one: where should the crew enter, where can materials be staged, what rooms are off-limits, and will anyone need the work zone the same evening? If the room is a primary bedroom, family room, or one of the central living spaces in an occupied Oakville home, that should be planned up front rather than improvised once protection is already in place.
Trade coordination matters too. If an electrician is adding pot lights, changing fixtures, or relocating smoke detectors, the ceiling sequence should reflect that. Some electrical steps are better before the final skim passes, while some fixture installation is cleaner after priming and painting. That should be decided before the first day of removal.
What happens after the popcorn is removed
Many homeowners think the hardest part is over once the texture is off. In reality, removal only starts the finish process. What happens next is what decides whether the room ends up looking flat, clean, and modern instead of simply scraped.
A typical professional sequence looks like this:
- Controlled removal or resurfacing based on the ceiling condition
- First repairs to exposed defects such as torn areas, cracks, seams, old patches, or loose joints
- Full or partial surface smoothing to flatten the ceiling and blend transitions
- Sanding and quality checks under normal lighting and strong daylight
- Final prep to reveal anything that still needs correction before paint
- Flat ceiling paint and final cleanup or walkthrough
That sequence matters because cleanup after popcorn ceiling removal is not just about hauling debris away. It includes dust control during sanding, keeping adjacent rooms protected until dusty stages are done, and making sure the space can actually be used again without residue being left on floors, vents, shelves, or furniture.
If you want the broader service process, see our popcorn ceiling removal page. It covers how removal, smoothing, cleanup, and painting fit together as one scope.
Common preparation mistakes homeowners make
Most prep mistakes come from underestimating how much of the project happens after the texture comes down. Homeowners plan for scraping day and forget about repairs, sanding, drying time, or the need to keep the room controlled until the ceiling is genuinely paint-ready.
The most common mistakes are:
- Leaving too much furniture in the room and assuming it can all just be wrapped in place
- Assuming scraping alone is the whole job and not planning for repairs or smoothing work
- Not checking whether the popcorn ceiling has been painted
- Forgetting to seal vents or think about dust migration into nearby rooms
- Expecting a same-day perfect finish in every room regardless of repairs or drying time
- Underestimating how much previous cracks, stains, patches, or tape issues can add to the finish scope
- Forgetting to move fragile electronics, artwork, and sentimental items before the crew arrives
Homeowner checklist before popcorn ceiling removal day
Use this quick checklist the day before the crew arrives:
- Remove fragile items, decor, electronics, and valuables from the work zone
- Clear floor pathways and create as much open space as possible
- Confirm whether the ceiling appears painted, stained, cracked, or previously patched
- Decide which large items will stay and which should be moved out fully
- Keep pets and pet supplies out of the room
- Confirm access, parking, water access, and any condo logistics if applicable
- Discuss finish expectations, including repairs, smoothing, final prep, and paint
- Ask directly whether the ceiling seems painted and how that changes preparation
Set finish expectations before the room is put back together
Oakville homeowners often care as much about the final reflection quality as they do about the removal itself. That is especially true in larger open rooms, homes with tall windows, and spaces where flat white ceilings are expected to read cleanly under strong daylight. Preparation should reflect that standard.
Before the room is reassembled, it helps to talk through what a smooth ceiling really means in practical terms: whether minor imperfections will still be corrected before paint, when painters or electricians should step in, and how long the room should stay clear before furniture goes back. That conversation strengthens the whole topical prep cluster because it ties removal, ceiling repairs after popcorn removal, and final finish expectations into one realistic workflow instead of treating them as separate problems.
Need a cleaner popcorn ceiling removal plan in Oakville?
The best prep plan matches the actual room, not a generic national checklist. A vacant condo bedroom, a furnished main-floor family room, and an older Oakville home with painted texture all need different preparation choices before the ceiling is disturbed.
If you want help scoping the room properly, start with our Oakville popcorn ceiling removal page, then send photos and room details through the quote form. EPF Pro Services can advise what should be removed, what can stay, whether the ceiling looks painted, and what the real work sequence will likely be before the crew arrives.
Related local pages
Oakville popcorn ceiling removal — Indexable local service page covering neighbourhoods, process, and quote guidance.
Popcorn ceiling removal — Main service page covering removal, smoothing, cleanup, and paint-ready finishing.
Painted popcorn ceiling removal — Useful follow-up if the texture has already been painted and the prep scope may change.
FAQ
Do I need to empty the room completely before popcorn ceiling removal?
Not always, but the more space you clear the easier the room is to protect and finish. Vacant rooms are simpler, while furnished rooms need more staging, wrapping, and restricted access.
Can furniture stay in the room during popcorn ceiling removal?
Some large items can sometimes stay if they are consolidated and protected properly, but fragile items, electronics, and small furniture should usually be removed before the crew arrives.
How messy is popcorn ceiling removal?
It is inherently messy because ceiling texture is being disturbed overhead, but proper containment, vent sealing, floor protection, and careful sanding make a major difference in keeping the home cleaner.
Do I need to leave the house during the work?
Usually not for every project, but room access often stays limited while removal, repairs, smoothing work, and sanding are underway. Older ceilings or more complex containment needs can change that plan.
What if the popcorn ceiling was painted?
Painted popcorn ceilings usually need a more careful approach than unpainted texture. They often require more prep, more repair work, and more smoothing work to achieve a smooth finish.
What if the ceiling has stains or cracks?
Stains, cracks, old patches, loose joints, and nail pops should be identified before removal starts because they often add repair work after the texture is removed.
Is preparation different in older Oakville homes?
Yes. Older homes may have uncertain ceiling history, multiple paint layers, older repairs, plaster transitions, or material questions that justify a more careful assessment before disturbance.
What happens after scraping is done?
After removal, the ceiling usually still needs repairs, smoothing, sanding, final prep, and often flat ceiling paint before it is truly ready for normal lighting and everyday use.
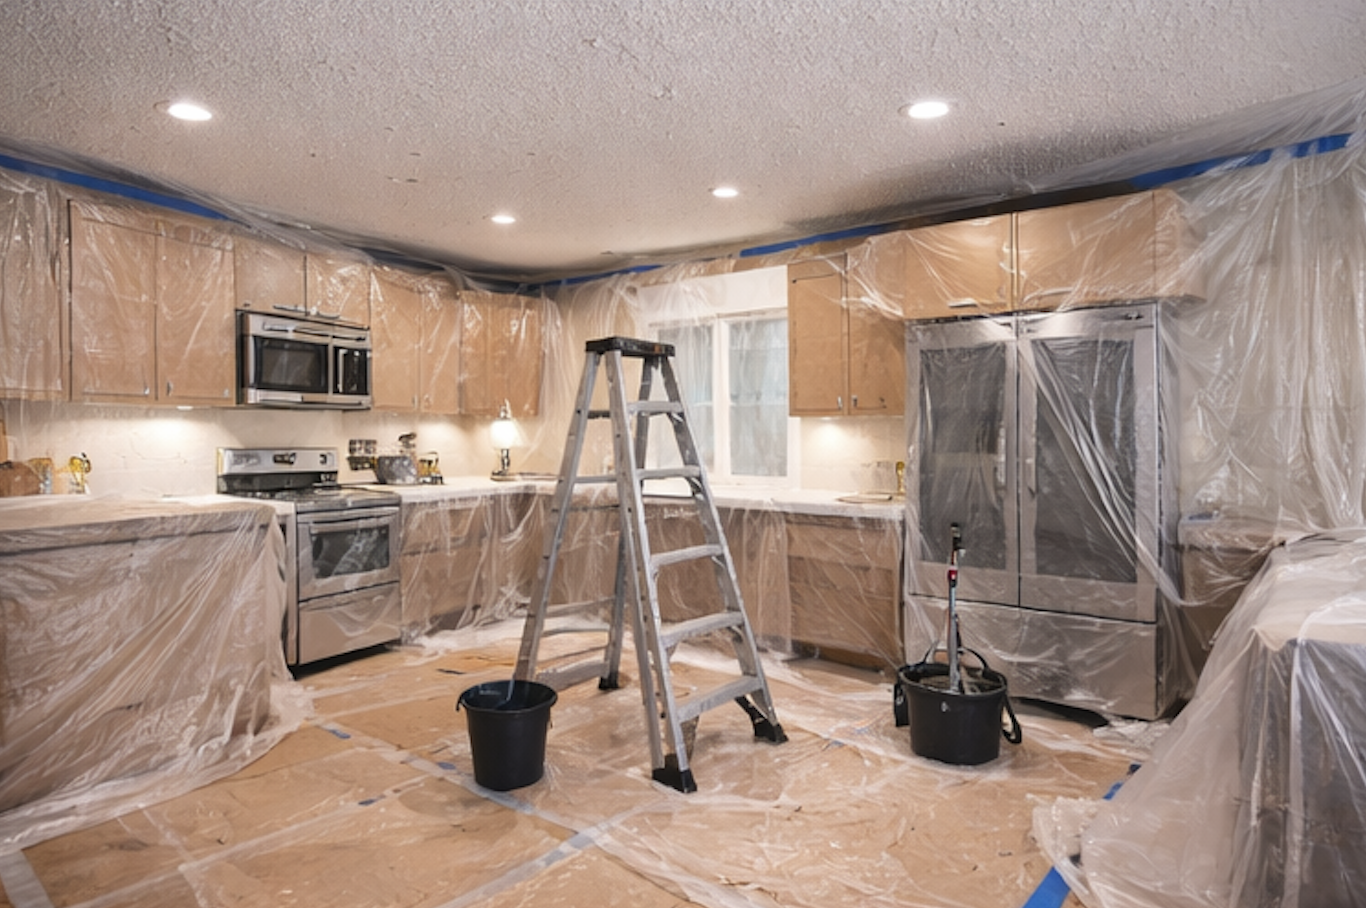
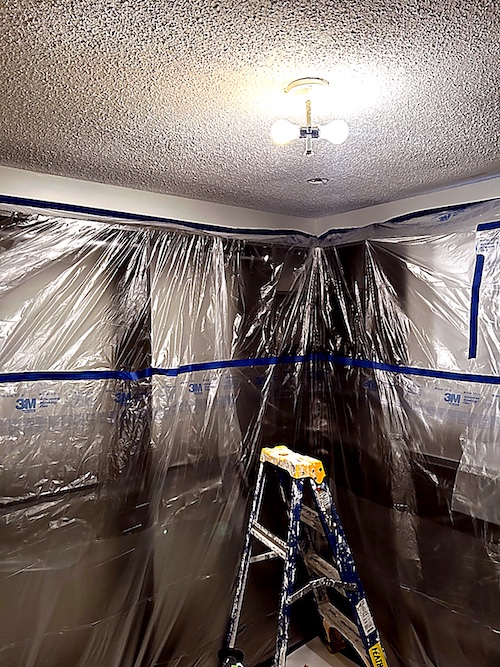
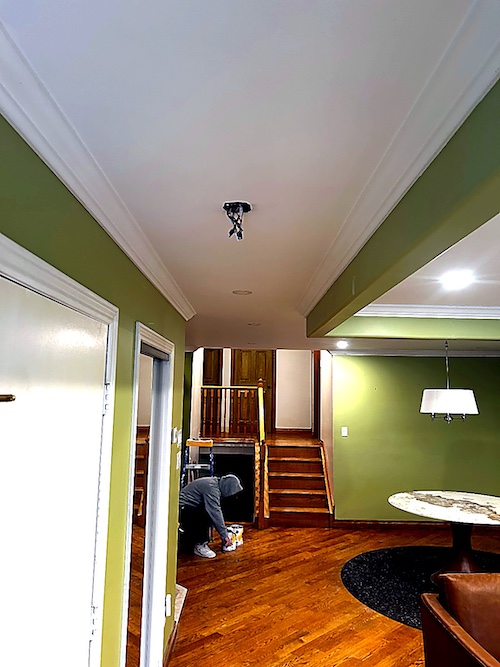
Field photos
Inspiration for your project
Popcorn ceiling terms this page covers
Useful terms to compare removal, skim coating, and finish scope before you book.
- how to prepare for popcorn ceiling removal
- prepare home for popcorn ceiling removal
- popcorn ceiling removal preparation
- how to get ready for popcorn ceiling removal
- prepare room for popcorn ceiling removal
- protect furniture during popcorn ceiling removal
- vacant vs furnished room popcorn ceiling removal
- painted popcorn ceiling prep
- asbestos popcorn ceiling Ontario
- cleanup after popcorn ceiling removal
- ceiling repairs after popcorn removal
- popcorn ceiling removal checklist
- Oakville popcorn ceiling removal preparation
Ready to plan your ceilings?
Get a popcorn ceiling quote today
Share photos, ceiling heights, and timing. We reply the same day with Oakville availability.
• HEPA dust control and Level 5 skim finishing
• Pot-light coordination and interior painting add-ons
• Flexible scheduling for condos and single-family homes
Quick next step
Send photos and room sizes through the main quote page, or call for a same-day reply.
Keeping the form on the main quote page helps this article stay lighter and faster.