How to Prepare Your Home for Popcorn Ceiling Removal in Grimsby
2026-04-06
Grimsby homeowner guide to popcorn ceiling removal prep, including room setup, painted ceiling checks, dust containment, cleanup expectations, and what happens after texture comes down.
Popcorn ceiling removal is easier on homeowners when the preparation is done properly. That sounds obvious, but many rooms still get staged too lightly: furniture stays in place, vents are overlooked, the ceiling condition is assumed instead of checked, and the homeowner plans only for scraping rather than for the repair and finishing work that follows.
In Grimsby, the prep conversation also has a local angle. Condo access, detached-home layouts, lake-effect humidity, and a mix of newer and older properties can all affect how the ceiling work should be planned from day one.
If you want the local service picture first, start with our Grimsby popcorn ceiling removal page. It gives you the city-level scope, project types, and the finish process behind a true smooth ceiling result.
This guide is meant to help Grimsby homeowners prepare the room more effectively, whether the project is in a newer home near the escarpment, a condo-style layout, or an older property closer to established neighbourhoods and mixed renovation histories.
Why preparation matters before popcorn ceiling removal
Ceiling projects run better when the room is genuinely ready. That means more than moving a few items aside. It means open floor paths, real surface protection, a clear idea of what is staying and what is leaving, and an honest look at whether the ceiling appears painted or previously repaired.
When preparation is weak, everything else becomes harder. Containment gets less reliable, cleanup takes longer, access becomes tighter, and the finishing stage loses efficiency because the room never really functions as a work area.
Proper preparation helps deliver:
- Better dust containment during removal, repairs, sanding, and cleanup
- More reliable ladder access and fewer interruptions during the job
- Better protection for floors, trim, and furnishings
- Stronger surface access for smoothing work and edge repairs
- Less friction between the work sequence and everyday household use
Vacant rooms vs furnished rooms
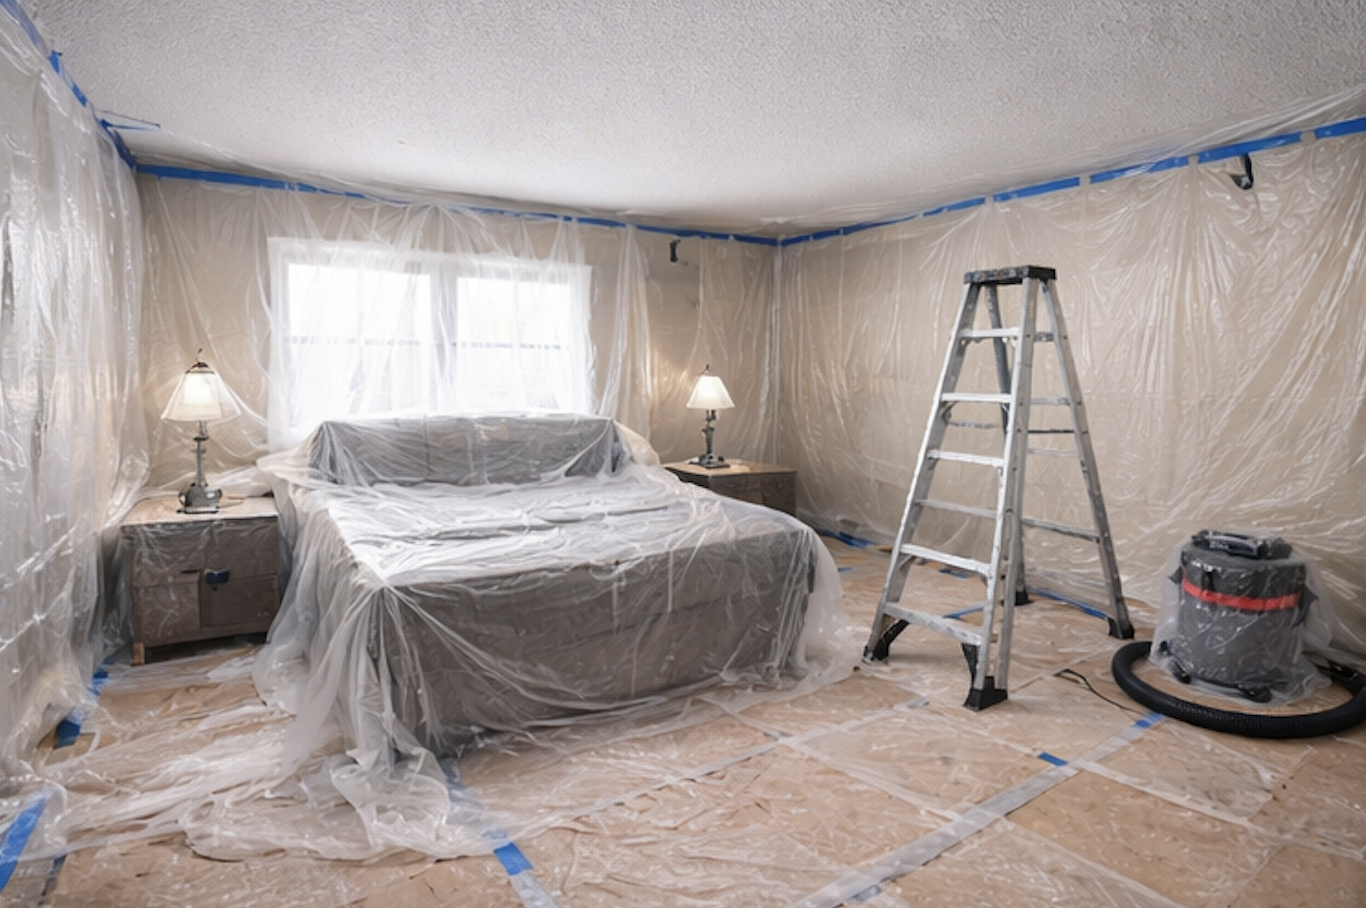
The first major prep question is whether the room is actually vacant. If it is, the work usually runs faster. If it is furnished, the prep has to be stricter.
1. Vacant rooms
Vacant rooms are the easiest to manage because full floor protection can be laid without interruption, ladders can move where needed, and the crew can continue into repairs and sanding without rebuilding the room setup every time they change stages.
But "vacant" still needs to mean usable. Stored boxes, renovation leftovers, bins, and temporary furniture along the perimeter still block corners, vents, and closet lines where the ceiling work continues.
2. Furnished rooms
Furnished rooms are common, especially in occupied homes where only one room is being upgraded at a time. That can work, but homeowners usually need to remove more than they first expect. Small items, electronics, decor, and valuables should come out. Larger pieces should stay only if they do not compromise access.
In family rooms and living rooms, it is usually the oversized sofa or media setup that causes the biggest access issue. In bedrooms, it is often the furniture around the bed rather than the bed itself.
A good rule is simple: if it is delicate, expensive, hard to clean dust from, or easy to remove now, remove it now.
What to remove before the crew arrives
Before the work begins, remove or relocate these items where possible:
- Artwork, mirrors, clocks, and loose wall decor
- Fragile objects, ceramics, glass, and sentimental pieces
- TVs, speakers, computers, gaming equipment, and office electronics
- Lamps, stools, benches, side tables, and smaller movable furniture
- Window coverings if they interfere with perimeter access
- Valuables, paperwork, medication, and personal belongings
- Pet items and anything that should stay fully outside the work zone
For larger items like sectionals, hutches, or oversized beds, confirm ahead of time whether they can stay without compromising the room. Not every large piece needs to leave, but every large piece does need to be evaluated honestly.
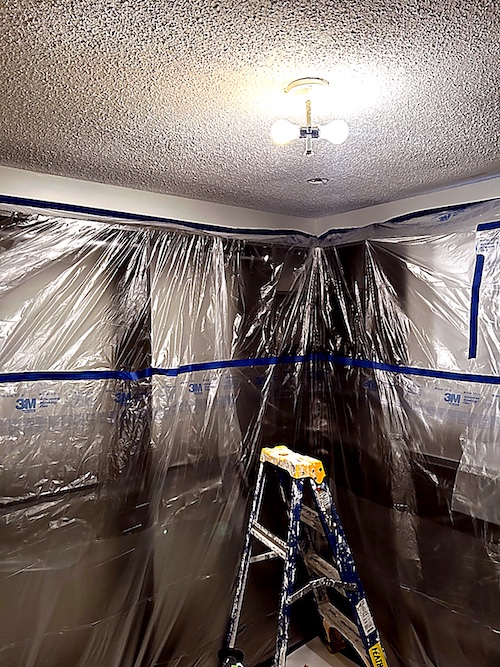
How to protect floors, walls, fixtures, and vents
Protection has to be planned like a system. Floors, openings, and adjacent rooms all react differently once the ceiling work begins. Removal, smoothing work, and sanding each bring their own mess profile.
Hardwood floors usually need stable layered protection so ladders and traffic do not shift it. Tile floors still deserve coverage to keep fine debris from collecting in joints. Carpet often needs the most care because dust settles into it quickly and is harder to clear if containment is weak.
Walls and trim near the ceiling line should also be considered, especially where recent painting, wallpaper, built-ins, or decorative trim make a cleaner perimeter more important.
Fixture and opening prep normally includes:
- Handling or protecting ceiling-mounted lights
- Discussing pot lights and cutouts before work begins
- Protecting smoke detectors where needed
- Sealing HVAC vents to limit dust movement
- Removing or isolating fans if they block access
- Protecting nearby rooms if the layout is open or connected
This is particularly important in Grimsby homes where open layouts and airflow can move fine dust farther than expected if adjacent spaces are ignored.
Check the ceiling before the project starts
The room may be ready even when the ceiling is not. A quick inspection helps set better expectations before work begins.
Look for stains, patch marks, cracks, sagging sections, nail pops, loose seams, previous repairs, or areas that appear shinier or harder than the rest. Those details often point to paint layers, old damage, or uneven substrate conditions that will matter later.
It also helps to identify bulkheads, skylights, sloped ceilings, or any parts of the ceiling plane that shift direction. These often add hand-work and edge detail even when the room itself is not especially large.
Painted vs unpainted popcorn ceiling preparation
Unpainted popcorn can sometimes be removed more predictably. Painted popcorn typically changes the project. Once paint seals the texture, scraping becomes less cooperative and the finish work usually becomes more repair-heavy.
That means a painted ceiling often needs more time, more smoothing work, and a more careful work sequence than homeowners assume at the start. Preparation should reflect that reality instead of treating every ceiling the same way.
If the texture has already been painted, read our painted popcorn ceiling removal guide next. It shows why painted ceilings often move from simple scraping into a more repair-focused resurfacing plan.
Older homes and asbestos considerations in Ontario
Older textured ceilings in Ontario should not be treated casually if the material history is uncertain. Testing may be appropriate before disturbance when the age of the home or the ceiling layers raise reasonable questions.
This is not about making the project sound more dramatic than it is. It is about making sure the prep is appropriate to the material. It is better to answer that question before the room is fully staged than after the workday has already started.
Plan for access, parking, and workday flow
Logistics are part of prep too. The crew still needs a clear route in, a place to stage tools and floor protection, access to water if needed, and a plan for whether the room or nearby spaces need to be usable again that evening.
In condos or tighter properties, parking and building access can matter more than expected. In detached homes, the question is often less about parking and more about how the room fits into the daily flow of the house while the ceiling is in progress.
If an electrician is part of the project, those steps should also be coordinated before work begins. Pot lights, fixture changes, and detector moves all affect the ceiling sequence.
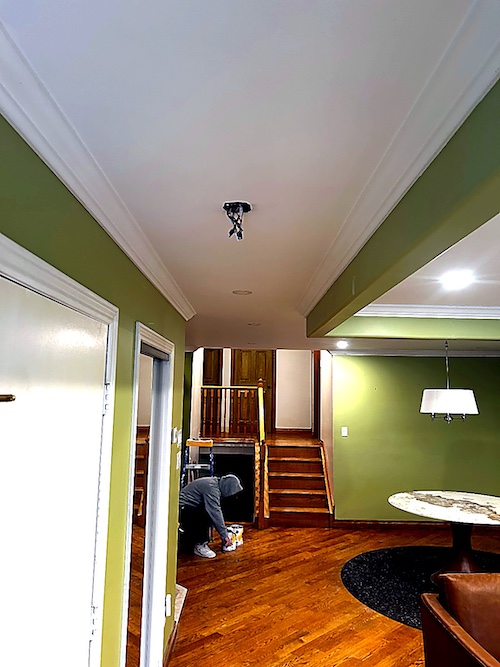
What happens after the popcorn is removed
Homeowners often think the room is almost done once the old texture comes down. It usually is not. What follows is the part that actually determines whether the ceiling looks smooth or just stripped.
A normal sequence looks like this:
- Remove or resurface the texture based on ceiling condition
- Repair exposed damage, torn areas, cracks, and old patches
- Smooth the surface so the ceiling looks flatter and more even
- Sand and inspect the ceiling under both normal light and side light
- Prime the ceiling so remaining imperfections show up before finish paint
- Paint the ceiling and complete final cleanup
That is why cleanup after popcorn ceiling removal is more than debris pickup. It includes dust management during sanding and making sure the room is genuinely usable again once the finish stages are complete.
For the broader service view, see our popcorn ceiling removal page.
Common prep mistakes homeowners make
- Leaving too much in the room because it seems "out of the way"
- Forgetting that the repair and sanding stages matter as much as removal
- Not checking whether the texture appears painted
- Leaving vents open and overlooking dust migration
- Assuming cleanup will be simple even if the room was never prepared properly
Homeowner checklist before popcorn ceiling removal day
- Remove decor, electronics, valuables, and fragile items
- Clear floor space and improve access around the room perimeter
- Check whether the ceiling shows paint, stains, cracks, or prior repairs
- Decide what large furniture can stay and what should go
- Keep pets and pet supplies out of the work area
- Confirm access, parking, and room-use expectations
- Review the finish plan for repairs, smoothing, final prep, and paint
Plan for drying time, sanding time, and room re-entry
Grimsby homeowners often think about removal day but not about the days immediately after it. Depending on the ceiling condition, the repair stage, and local moisture conditions, smoothing work and sanding may stretch the room timeline farther than expected if everyone assumes the ceiling should be ready for normal use too quickly.
Thinking about room re-entry ahead of time makes the page stronger topically because it ties together cleanup after popcorn ceiling removal, painted popcorn ceiling prep, and the practical question of when the room can actually go back to normal. That is especially useful in homes where the ceiling project affects a primary bedroom, a main family room, or another space that matters to the day-to-day routine.
Need a cleaner popcorn ceiling removal plan in Grimsby?
The best prep plan is always specific to the actual property. A condo-style layout, a detached home with a bright open ceiling, and an older house with prior repairs all need different assumptions.
If you want help scoping the room properly, start with our Grimsby popcorn ceiling removal page, then send photos and room details through the quote form. EPF Pro Services can help you decide what should be removed, what can stay, and what the ceiling condition suggests about the real finish plan.
Related local pages
Grimsby popcorn ceiling removal — Indexable local service page covering process, project types, and quote guidance.
Popcorn ceiling removal — Main service page covering removal, resurfacing, and paint-ready finishing.
Painted popcorn ceiling removal — Follow-up guide if the ceiling texture has already been painted.
FAQ
Do I need to empty the room completely before popcorn ceiling removal?
Not always, but more open space usually means cleaner protection and better access. Vacant rooms are easier to manage than furnished ones.
Can furniture stay in the room during popcorn ceiling removal?
Some larger pieces can stay if they do not compromise ceiling access and can be protected properly, but fragile items, electronics, and smaller furniture should usually be removed.
What if the popcorn ceiling has already been painted?
Painted popcorn usually requires a slower and more repair-heavy finish process than unpainted texture. It often adds more smoothing work and more drying time.
How messy is popcorn ceiling removal?
It is an overhead dust-producing project, but proper containment, sealed vents, floor protection, and controlled sanding make a significant difference in how clean the home stays.
What happens after the texture comes off?
The ceiling usually still needs repairs, smoothing, sanding, final prep, and flat paint before it is truly ready under normal lighting.
Is prep different in older Grimsby homes?
Yes. Older homes can have uncertain ceiling history, previous repairs, multiple paint layers, and other issues that change the prep and finish plan.
Field photos
Inspiration for your project
Popcorn ceiling terms this page covers
Useful terms to compare removal, skim coating, and finish scope before you book.
- how to prepare for popcorn ceiling removal
- prepare home for popcorn ceiling removal
- popcorn ceiling removal preparation
- painted popcorn ceiling prep
- cleanup after popcorn ceiling removal
- ceiling repairs after popcorn removal
- Grimsby popcorn ceiling removal preparation
- popcorn ceiling removal checklist
- vacant vs furnished room popcorn ceiling removal
- asbestos popcorn ceiling Ontario
Ready to plan your ceilings?
Get a popcorn ceiling quote today
Share photos, ceiling heights, and timing. We reply the same day with Grimsby availability.
• HEPA dust control and Level 5 skim finishing
• Pot-light coordination and interior painting add-ons
• Flexible scheduling for condos and single-family homes
Quick next step
Send photos and room sizes through the main quote page, or call for a same-day reply.
Keeping the form on the main quote page helps this article stay lighter and faster.