How to Prepare Your Home for Popcorn Ceiling Removal in Dundas
2026-04-06
Dundas homeowner guide to popcorn ceiling removal prep, with practical advice for heritage homes, furnished rooms, painted ceilings, dust control, and post-removal finishing.
Preparing for popcorn ceiling removal in Dundas takes a little more thought than a generic renovation checklist usually suggests. The project still needs normal things like floor protection and room access, but many Dundas homes also bring older trim, original hardwood, variable ceiling history, and rooms that were built long before modern open-concept work methods became standard.
That does not make the project harder by default. It just means preparation matters more. The better the room is set up and the more clearly the ceiling condition is understood before work starts, the cleaner and more predictable the whole process becomes.
If you are comparing the local scope first, start with our Dundas popcorn ceiling removal page. It gives you the neighbourhood-level service context, including the kinds of older homes and heritage-style details that often change the prep and finish plan.
This article is designed for actual Dundas conditions, from older detached homes near downtown and King Street to family homes off Governor’s Road and valley-area properties with more custom trim, older ceilings, or uneven historical repairs.
Why preparation matters so much in Dundas homes
Ceiling work always benefits from good preparation, but in Dundas it often matters twice. Older rooms may have tighter access, older finishes, or more delicate surfaces around the ceiling perimeter. If the room is not opened up properly before work begins, the crew spends more time protecting around obstacles and less time moving through the actual finish process efficiently.
Preparation also helps avoid surprises. Older homes are more likely to have hidden patches, prior water marks, mixed materials, or multiple paint layers that only become obvious once the work is underway. A little more planning at the front end usually means fewer interruptions later.
The practical advantages of proper preparation include:
- Better dust control in older layouts with more openings and connected rooms
- Better protection for original hardwood, trim, and built-in details
- Cleaner access for ladder movement and hand-finish work around edges
- Fewer delays caused by moving furniture or rediscovering ceiling issues on site
- Better overall finish quality once smoothing work and sanding begin
Vacant rooms vs furnished rooms
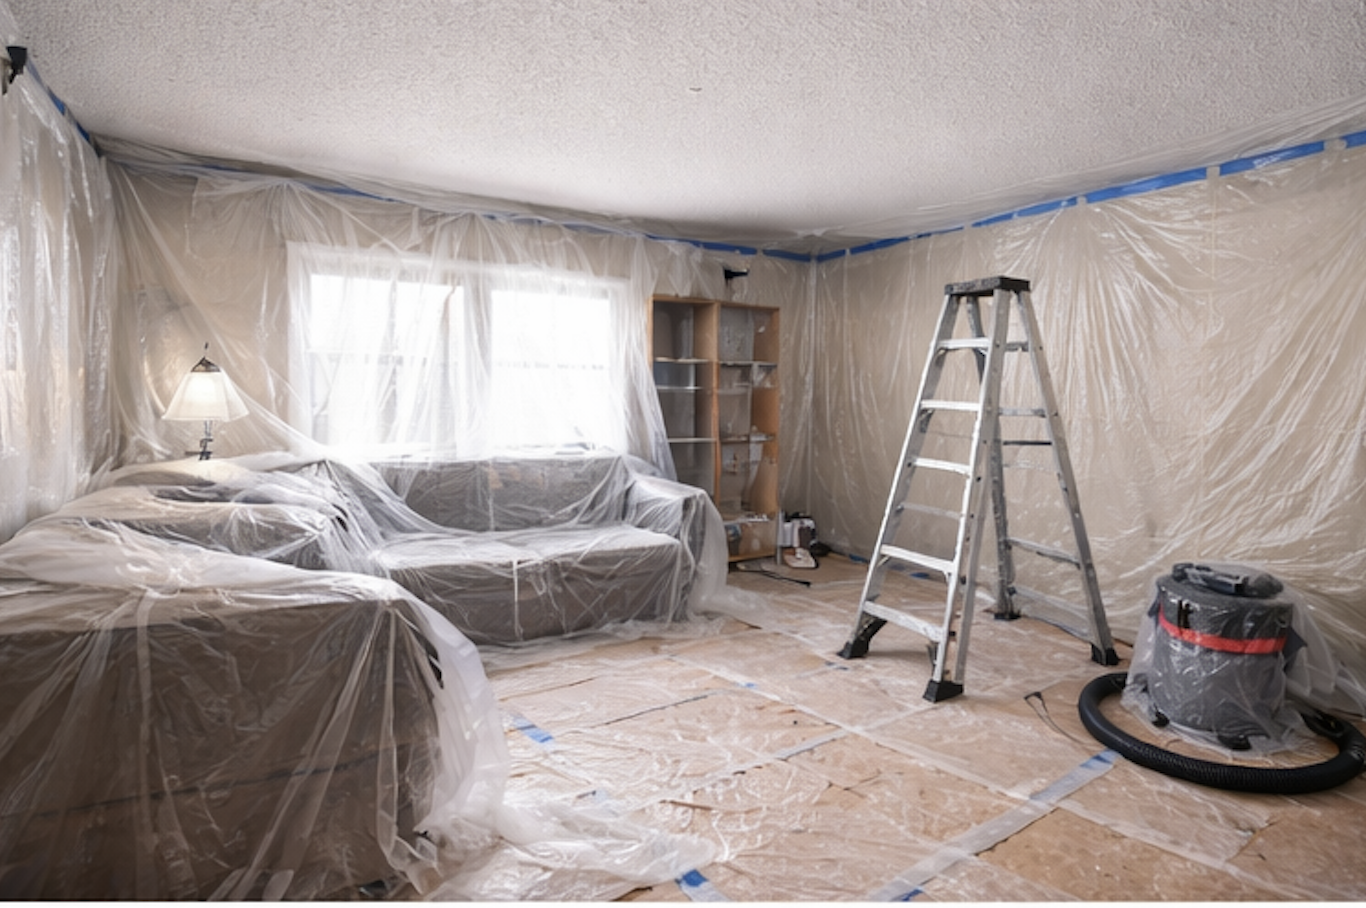
This decision changes the prep plan right away. A vacant bedroom or office gives the crew freedom to protect the floor properly and work the ceiling edge to edge. A furnished room can still be done, but it increases the need for staged protection and smarter access planning.
1. Vacant rooms
A truly vacant room is the easiest way to prepare for ceiling work. When the floor is open, the crew can place ladders safely, protect surfaces more completely, and move from removal to repairs without rebuilding the setup multiple times. That usually makes the work cleaner and more efficient.
In older Dundas homes, even vacant rooms should still be checked for stored items near the perimeter. Boxes, spare doors, stored furniture, and renovation materials still interfere with corners, closets, and trim details where hand-finishing often matters most.
2. Furnished rooms
Furnished rooms require a more selective approach. A bed or larger dresser might stay if the room still functions, but smaller furniture, lamps, mirrors, artwork, and electronics should usually come out. The more delicate the room contents, the less helpful it is to rely on wrapping alone.
In heritage-style or older homes, furniture often sits closer to the walls and trim lines, which makes perimeter access harder than in newer layouts. That is another reason to clear more than you think you need to.
What to remove before the crew arrives
If you want the prep day to go smoothly, remove the things that most often create unnecessary risk or slowdowns.
That usually includes:
- Wall decor, framed artwork, mirrors, and hanging accessories
- Fragile decorative pieces and anything sentimental
- Televisions, stereos, computers, and other electronics
- Smaller furniture such as side tables, benches, stools, and accent chairs
- Window coverings if they block edge access near the ceiling
- Documents, valuables, medication, and personal items
- Pet items and anything that would be hard to clean dust from afterward
If you are unsure about heavier items like built-ins, large hutches, or oversized furniture, ask before work starts. Some can be protected in place. Others make the room functionally unworkable even if they technically still fit in the space.
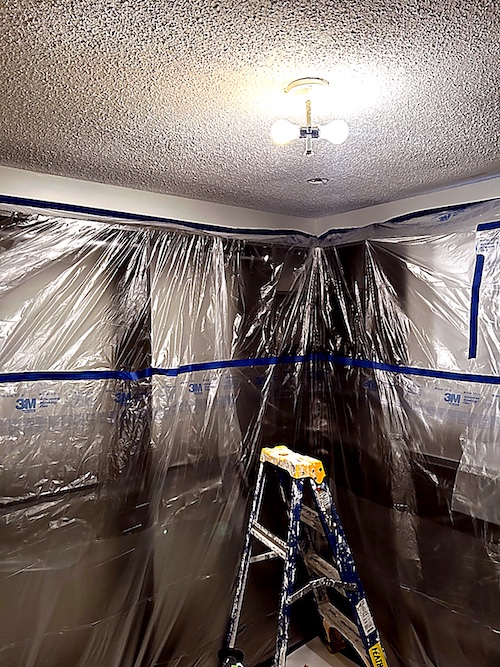
How to protect floors, walls, fixtures, and vents
Older Dundas homes often deserve more careful surface protection, not less. Original hardwood, older tile, plaster transitions, decorative trim, and detailed millwork can all be harder to correct if they are marked or dusted heavily during ceiling work.
Floor protection should be stable enough for ladders, traffic, and repeated movement through the room. Hardwood usually needs more than a light drop cloth. Carpet needs stronger edge control because dust settles into it quickly. Tile still benefits from protection because residue and slurry can collect around joints and base lines.
The same logic applies to trim and walls. If the room has recent wall paint, wallpaper, decorative trim, or older details near the ceiling line, masking and perimeter protection matter a lot.
Fixture and opening prep usually includes:
- Protecting or removing ceiling-mounted light fixtures
- Planning around pot lights, new cutouts, or future fixture changes
- Protecting smoke detectors where needed
- Sealing vents to stop dust from moving through the home
- Isolating ceiling fans and nearby openings that affect access
- Thinking about adjacent rooms if the space connects to halls or staircases
Dust control is especially important in Dundas homes with tighter room-to-room transitions and more finished wood surfaces that show residue quickly.
Check the ceiling carefully before removal starts
The room might be ready while the ceiling is not. Before the project begins, it helps to look for anything that could change the removal method or the finishing plan.
Check for cracks, stains, old repairs, sagging areas, patch lines, loose joints, nail pops, or parts of the ceiling that look shinier or harder than the rest. Those differences often point to prior paint, old water issues, or surface repairs that will matter later.
Also pay attention to plaster transitions, older additions, crown details, skylight edges, and any place where the ceiling changes direction or material. In Dundas homes, those transitions often affect finishing more than the raw square footage does.
Painted vs unpainted popcorn ceiling preparation
This is one of the most important prep questions. Unpainted popcorn can sometimes be removed more predictably. Painted popcorn usually cannot. Once paint has sealed the texture, the removal phase gets less forgiving and the ceiling often needs more resurfacing afterward.
That means the homeowner should plan not just for removal but for a broader finish process. Painted ceilings often require more skim-coat work, more drying time, and a different expectation for how quickly the room can be put back to normal.
If the texture has already been painted, read our painted popcorn ceiling removal guide next. It explains why painted texture usually changes both the removal method and the ceiling-finishing scope.
Older homes and asbestos considerations in Ontario
Dundas has many older homes, and older textured ceilings in Ontario should never be treated casually when the material history is unclear. Testing may be appropriate before the ceiling is disturbed, especially in homes where renovations happened in layers over decades.
The point here is not to overstate risk. The point is to make smarter decisions early. If age or prior coatings raise a material question, it is better to answer it before the room is fully staged and the project is underway.
That can change the method, the schedule, and who should handle the work. A little caution at the front end is a lot easier than stopping mid-project because the ceiling condition was assumed instead of verified.
Plan for access, parking, and room use
Logistics matter in Dundas because many properties have tighter driveways, narrower entries, older floor plans, and rooms that still need to remain functional while work is going on. The crew needs a clear entry path, a place to stage tools and protection materials, and a plan for whether the room has to be usable again that evening.
If the project is in a main hallway ceiling, a primary bedroom, or a room near older staircases or entry routes, that should be discussed before day one. Small layout constraints affect ceiling work more than people realize.
The same is true if an electrician is changing fixtures or adding pot lights. Those steps should be coordinated with the ceiling sequence early so finishing work does not have to be reopened later.
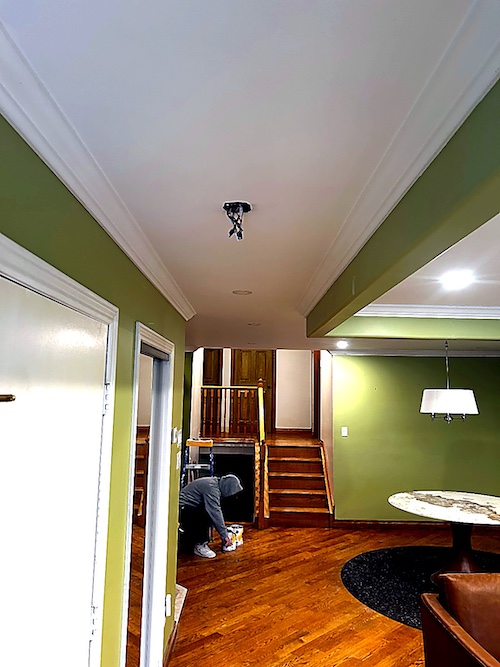
What happens after the popcorn is removed
Removal is only the first visible stage. The finish process that follows is what actually determines whether the ceiling looks smooth again.
A typical sequence looks like this:
- Remove or resurface the texture depending on what the ceiling allows
- Repair exposed defects, torn areas, seams, cracks, and older patches
- Apply surface-smoothing work to flatten the surface and blend old transitions
- Sand and inspect carefully under working light and side light
- Prime to expose anything that still needs correction
- Paint the ceiling and complete a final cleanup walkthrough
That is why cleanup after popcorn removal is not just about debris. It also means managing sanding dust, keeping adjoining spaces protected, and making sure the room can actually return to normal use without lingering dust or residue.
For the broader process overview, see our popcorn ceiling removal page.
Common prep mistakes homeowners make
- Leaving too much furniture in place because the room looks "mostly clear"
- Underestimating how much perimeter access matters in older rooms
- Forgetting to ask whether the ceiling looks painted
- Assuming the project ends once the texture is scraped
- Leaving vents open or ignoring connected halls and stair areas
- Expecting heritage-style rooms to finish at the pace of a simple empty bedroom
Homeowner checklist before popcorn ceiling removal day
- Remove breakables, electronics, artwork, and valuables
- Clear floor space and perimeter access as much as possible
- Confirm whether the ceiling shows cracks, stains, repairs, or paint
- Decide which large items can realistically stay
- Keep pets and their supplies away from the room
- Confirm access, parking, and whether the room must be usable that evening
- Review finish expectations for repairs, smoothing, final prep, and paint
Account for trim details, hardwood protection, and slower room resets
In Dundas homes, preparation often has to respect more than the ceiling itself. Older trim profiles, tighter room layouts, original hardwood, and uneven transitions from past repairs can all slow down how quickly the room can be reset once the popcorn texture is removed.
That is why a stronger prep plan does not stop at moving furniture and sealing vents. It also considers how long protective floor layers should stay down, whether edge work near older trim should be checked again before paint, and when the room is actually ready for furniture to return. Those details strengthen the topical cluster because they connect heritage-home prep, cleanup after popcorn ceiling removal, and ceiling repair after popcorn removal into one practical sequence.
Need a cleaner popcorn ceiling removal plan in Dundas?
A useful prep plan depends on the actual room and the actual house. A newer spare room and an older heritage-style ceiling do not prepare the same way, even if the square footage is similar.
If you want help scoping the room properly, start with our Dundas popcorn ceiling removal page, then send photos and room details through the quote form. EPF Pro Services can help you decide what should be removed, what can stay, and whether the ceiling condition suggests a simple prep plan or a more careful older-home finish sequence.
Related local pages
Dundas popcorn ceiling removal — Neighbourhood-level service page for Dundas homes, including older-house prep and quote guidance.
Popcorn ceiling removal — Main service page covering removal, resurfacing, and paint-ready ceiling finishing.
Painted popcorn ceiling removal — Follow-up guide if the texture has already been painted.
FAQ
Do older Dundas homes need different preparation for popcorn ceiling removal?
Often yes. Older homes may have original hardwood, older trim, plaster transitions, uncertain ceiling history, or multiple paint layers that change how the room should be prepared and how the finish work should be planned.
Can furniture stay in the room during popcorn ceiling removal?
Some larger items may stay if they do not block access and can be protected properly, but fragile items, electronics, and smaller furniture should usually be removed.
What if the popcorn ceiling has already been painted?
Painted texture usually requires a more careful and repair-heavy process than unpainted popcorn. It often adds skim-coat work and extends the finish sequence.
How messy is popcorn ceiling removal?
It is still a messy overhead project, but proper containment, floor protection, sealed vents, and controlled sanding make a major difference in keeping the rest of the home cleaner.
What happens after the texture is removed?
The ceiling typically still needs repairs, smoothing, sanding, final prep, and flat paint before it is truly ready to use under normal lighting.
Do I need to leave the house during the work?
Usually not for every project, but room access often stays limited while the removal, repair, and sanding stages are active. Older homes and more complex containment needs can change that plan.
Field photos
Inspiration for your project
Popcorn ceiling terms this page covers
Useful terms to compare removal, skim coating, and finish scope before you book.
- how to prepare for popcorn ceiling removal
- prepare home for popcorn ceiling removal
- popcorn ceiling removal preparation
- painted popcorn ceiling prep
- asbestos popcorn ceiling Ontario
- cleanup after popcorn ceiling removal
- ceiling repairs after popcorn removal
- Dundas popcorn ceiling removal preparation
- popcorn ceiling removal checklist
- vacant vs furnished room popcorn ceiling removal
Ready to plan your ceilings?
Get a popcorn ceiling quote today
Share photos, ceiling heights, and timing. We reply the same day with Mississauga, Oakville, and GTA availability.
• HEPA dust control and Level 5 skim finishing
• Pot-light coordination and interior painting add-ons
• Flexible scheduling for condos and single-family homes
Quick next step
Send photos and room sizes through the main quote page, or call for a same-day reply.
Keeping the form on the main quote page helps this article stay lighter and faster.