Baseboard Installation in Mississauga: Cost, Materials, and What to Expect
Updated June 13, 2026
A practical Mississauga homeowner guide to baseboard installation, replacement, materials, cost factors, finishing, and what to send for a clear quote.
- Trusted since 2005
- Fully insured
- Dust-controlled sanding
- Paint-ready finishing
- 3-year workmanship warranty

Quick Answer
For most Mississauga homes, a good baseboard installation quote should include measuring, profile selection, careful old trim removal when needed, new baseboard installation, nail-hole filling, caulking, sanding, cleanup, and a clear note about whether painting is included. The final price depends mainly on linear footage, profile height, material, corners, wall condition, flooring transitions, and whether the home is occupied during the work.
Baseboards look simple until they are installed badly. Gaps at inside corners, wavy runs along uneven drywall, nail holes that show through paint, bulky caulk lines, and messy transitions around door casing can make an otherwise clean renovation feel unfinished. In Mississauga homes, baseboard installation often happens after flooring, drywall repair, painting, basement finishing, or a larger main-floor refresh, so the trim needs to tie several finished surfaces together.
If you are planning trim work now, start with the local service page for baseboard installation in Mississauga. For the full service overview, see our baseboard installation and replacement service.
This guide explains what homeowners usually need to know before asking for a quote: how baseboard installation is priced, which materials make sense, when old trim should be removed, how caulking and filling should be handled, when painting belongs in the scope, and what details to send so the estimate is not a guess.
Quick scope table for Mississauga baseboard projects
| Project situation | What usually matters most | Quote note |
|---|---|---|
| New flooring just installed | Expansion gaps, shoe moulding, floor protection, profile height | Send photos of floor edges and door casing |
| Old baseboards being replaced | Removal damage, drywall touch-ups, disposal, matching casing | Confirm if painting is included |
| Basement finishing | Long runs, corners, moisture considerations, paint-ready finish | Send room sizes and linear footage if available |
| Condo or occupied home | Access, elevator rules, dust control, cutting setup, daily cleanup | Mention parking, working hours, and building rules |
Why baseboards make such a visible difference
Baseboards are one of the last finish details in a room, but they are not just decoration. They cover the joint where flooring meets the wall, protect the lower wall from scuffs, frame the room visually, and help the floor, wall, door casing, and paint finish feel connected. When baseboards are straight, tightly fitted, and cleanly caulked, the room feels finished. When they are rushed, every corner and wall line draws attention.
This is why baseboard installation should not be treated as a quick add-on after the real renovation is done. A freshly painted room with poor baseboard seams still looks rough. New flooring with a mismatched or wavy trim line can look incomplete. A basement with long walls and low-angle light can show every gap and every uneven caulk bead.
The best time to plan baseboards is before the final paint or immediately after flooring decisions are made. That allows the installer to choose the right profile height, account for gaps at the floor, protect finished surfaces, and confirm whether the baseboards will be installed pre-primed, pre-painted, or finished on site.
What a proper baseboard installation includes
A clean baseboard installation usually includes more than cutting boards and nailing them to the wall. The scope should be clear before work starts, because quotes can look very different depending on what is included.
Measuring and profile planning
The first step is measuring the rooms and confirming the trim profile. Linear footage matters, but so do the number of inside corners, outside corners, door openings, closets, stairs, columns, cabinet returns, and transitions into other trim. A simple square bedroom is different from an open-concept main floor with several doorways and floor transitions.
Profile height also matters. A taller modern baseboard can look better in newer renovations, but it can cost more, may need more careful wall prep, and can expose old paint lines if the previous baseboard was lower or shaped differently. If door casing is short or thin, a very tall baseboard can look out of proportion unless the casing is also being updated.
Old trim removal and wall prep
When old baseboards are removed, some drywall paper, paint, caulk, or corner edges may come off with them. That is normal, especially if the trim was heavily caulked or painted over several times. The important question is whether wall touch-ups are included in the quote. Minor cleanup is usually part of a good trim scope, but larger drywall repair or repainting should be identified separately.
If old trim removal exposes damaged drywall, our drywall repair in Mississauga service can help with torn paper, damaged corners, and wall patching before the final trim and paint stage.
Cutting, fitting, and fastening
Good baseboard work depends on accurate measuring, clean cuts, proper fastening, and practical corner decisions. Inside corners may be coped or mitered depending on profile, wall condition, and installer preference. Outside corners need tight miters and enough support so the joint does not open over time. Long runs need planned joints so seams are not placed randomly in obvious sightlines.
Fastening also matters. Nails should be set cleanly without splitting the trim or leaving raised heads. On uneven walls, the installer may need to manage small gaps without forcing the baseboard into a wave. No home is perfectly straight, especially after older flooring, drywall, or previous trim work, so judgment matters.
Filling, caulking, sanding, and paint-ready handoff
The finish stage is where many baseboard jobs separate themselves. Nail holes should be filled, seams should be handled cleanly, and the top edge should be caulked where the baseboard meets the wall. Caulk should not be used as a heavy filler for bad cuts. It should create a clean paint line, not hide poor fitment.
A paint-ready handoff usually means the trim is installed, nail holes are filled, seams are caulked, rough filler is sanded, and the area is cleaned. Painting may or may not be included. If you want the trim fully painted, confirm whether the quote includes primer, finish coats, touch-ups, and wall paint touch-ins where caulk meets the wall.
Cost factors for baseboard installation in Mississauga
Baseboard installation is normally estimated by a mix of linear footage, material choice, complexity, finishing level, and site conditions. Online pricing can be useful as a rough starting point, but it often misses the details that affect real homes: old trim removal, wall damage, corners, painting, stair areas, condo access, and whether the work is happening in an occupied space.
For a realistic quote, expect the contractor to ask about the total rooms, approximate linear footage, baseboard height, material, whether old trim is already removed, whether floors are finished, whether painting is needed, and whether there are stairs or many doorways. A low number that only covers installation can become more expensive if removal, caulking, filling, or painting are added later.
The biggest price factors are usually:
- Linear footage: more walls and longer runs mean more material and labour.
- Profile height and detail: taller or more detailed profiles take more material and more careful finishing.
- Material: MDF is common for painted interiors, while wood, poplar, hardwood, or PVC may change cost and handling.
- Number of corners and transitions: doorways, closets, stairs, columns, and built-ins add cutting time.
- Old baseboard removal: removal can reveal drywall or paint repairs that were hidden.
- Painting: primed trim is not the same as finished painted trim.
- Occupied home protection: finished floors, furniture, dust control, and cleanup take planning.
- Condo access: elevator booking, parking, cutting location, and building rules can affect scheduling.
MDF, pine, poplar, hardwood, or PVC: which baseboard material is best?
There is no single best material for every Mississauga home. The right choice depends on the room, paint or stain plan, moisture exposure, budget, and how closely the new trim needs to match existing door casing.
MDF baseboards
MDF is a common choice for painted baseboards because it is smooth, stable, and usually cost-effective. It takes paint well and works for many bedrooms, hallways, living rooms, and finished basements. The limitation is moisture. MDF is not the best choice where water exposure is likely unless the product and location are appropriate.
Finger-jointed pine or solid pine
Pine and finger-jointed pine are common trim materials. They are workable and can be painted, but knots, grain, and movement can affect the finish if the wrong product is chosen. Finger-jointed trim is usually made for painting, while stain-grade solid wood needs a different expectation.
Poplar and hardwood
Poplar is often used where a better paint-grade wood trim is desired. Hardwood is more common when the trim will be stained or when the room has a custom finish package. These materials can look excellent, but they usually cost more and require careful finishing.
PVC or moisture-resistant trim
PVC or moisture-resistant trim can make sense in areas where water exposure is a concern, such as some laundry rooms, bathrooms, or lower-level areas. It is not automatically needed everywhere, and it should still be installed and finished cleanly so it does not look like an afterthought.
When should baseboards be installed during a renovation?
Baseboards are usually installed after flooring and major wall work, but before final paint touch-ups. If drywall repair, wallpaper removal, or interior painting is part of the project, the order matters.
A practical sequence is often: finish flooring, repair walls, install baseboards, fill and caulk, then complete final trim paint and wall touch-ups. If walls are being fully painted, some homeowners prefer to paint walls first and then install and paint baseboards. Others prefer trim first, caulk, then final wall touch-ups. The right order depends on the painter, flooring type, and how much wall repair is needed.
If the trim work is part of a larger refresh, coordinate it with interior painting services so caulk lines, wall touch-ups, and baseboard finish coats are not treated as separate last-minute tasks.
For condos and occupied homes, scheduling also matters. Cutting trim inside a finished home needs a clean setup. Finished floors should be protected. Dust should be controlled. Furniture may need to be moved in stages. If the building has elevator or loading rules, share those details before booking.
Simple trim replacement is usually not the kind of work that drives a building permit, but larger renovation scopes can be different. If baseboards are part of a bigger project involving structural, fire separation, plumbing, electrical, or basement work, check the City of Mississauga permits and approvals guidance for the full scope.
Shoe moulding and quarter round: do you need it?
Shoe moulding or quarter round is used to cover small gaps between baseboards and flooring. It is common after flooring installation because floors need expansion space and walls are rarely perfectly straight. The decision depends on the flooring, gap size, baseboard profile, and look you want.
Some homeowners prefer a cleaner modern look with baseboard only. That can work when the flooring edge is tight and the baseboard sits cleanly. Other homes need shoe moulding because the gap is too large or the floor line varies. A good installer should explain the tradeoff instead of adding shoe moulding automatically.
Common problems that show up after poor baseboard installation
The most common problems are not dramatic. They are small details that repeat around the room. A single slightly open corner may not matter, but when every corner, seam, and paint line has a problem, the room loses its clean finish.
- Open miters at outside corners.
- Heavy caulk used to cover inaccurate cuts.
- Nail holes that were not filled or sanded properly.
- Wavy trim caused by uneven walls or rushed fastening.
- Baseboards installed before flooring gaps were understood.
- Mismatched profile height beside existing door casing.
- Paint build-up, rough edges, or visible primer.
- Damaged drywall left behind after old trim removal.
Most of these issues are preventable with better planning. The installer needs to understand the condition of the walls, the flooring edge, the trim profile, and the expected finish before cutting starts.
DIY vs hiring a baseboard installer
Baseboard installation can be DIY-friendly for a small, simple room if the homeowner has the right saw, nailer, measuring tools, caulk, filler, patience, and paint setup. The difficulty rises quickly when rooms have uneven walls, many corners, tall profiles, stairs, old trim removal, or a visible main-floor area where every detail is easy to see.
DIY mistakes usually cost time rather than one single big failure. Boards get cut short. Inside corners do not close. Outside miters open. Trim gets nailed before the floor gap is understood. Caulk becomes too heavy. Paint lines become rough. If you enjoy finish carpentry and have time to test pieces, DIY may be reasonable. If the project is a main living area, a full floor, a basement finish, or a home being prepared for sale, professional installation is usually the cleaner choice.
What to send for a clear Mississauga quote
You do not need perfect measurements to start. Good photos and basic details usually let a contractor tell whether the job is straightforward or needs a site review.
Send the following:
- One wide photo of each room.
- Close photos of corners, door casing, floor edges, and any damaged baseboards.
- Approximate room sizes or linear footage if you have it.
- The baseboard height or profile you want, if already chosen.
- Whether old trim is still installed or already removed.
- Whether painting is needed or only paint-ready finishing.
- Whether the home is occupied, vacant, a condo, or under renovation.
- Any building access rules, parking limits, or elevator booking needs.
These details help separate a simple install from a full trim replacement with drywall touch-ups, caulking, painting, disposal, and staging. It also helps avoid a quote that sounds low because important finishing steps were not included.
Local baseboard installation in Mississauga homes and condos
Mississauga has a mix of condos, townhomes, older detached homes, basement renovations, and main-floor updates. The service details change by property type. A condo may need quieter cutting, elevator planning, and tighter staging. A basement may need long runs, moisture-aware material choices, and clean transitions around mechanical rooms. An older detached home may need careful removal because previous paint and caulk can pull drywall paper when the trim comes off.
The local point is not that every neighbourhood has the same trim problem. It is that the quote should reflect the actual home: access, room layout, flooring, wall condition, and how finished the space already is. That is why photos are more useful than a generic per-room price.
EPF Pro Services handles Mississauga baseboard installation and replacement, including trim removal, new installation, shoe moulding, filling, caulking, and paint-ready finishing. If your project also includes wall repairs or repainting, we can coordinate the trim scope with drywall and painting work so the finished room looks complete.
Ready for a cleaner trim finish?
Baseboards should not be the detail that makes a finished room look unfinished. Before comparing quotes, make sure each contractor is pricing the same scope: material, linear footage, old trim removal, wall prep, installation, nail-hole filling, caulking, sanding, painting, cleanup, and disposal.
For a clear next step, request a quote through the EPF Pro Services quote page. Send photos, room sizes, trim height or profile ideas, and whether you need paint-ready trim or fully painted baseboards.
FAQ
How much does baseboard installation cost in Mississauga?
The cost depends on linear footage, profile height, material, corners, old trim removal, wall condition, caulking, filling, painting, and access. A proper quote should clearly say what is included instead of only giving a per-foot number.
Should baseboards be installed before or after flooring?
Baseboards are usually installed after flooring so they can cover the wall-to-floor transition properly. If there are expansion gaps or uneven floor lines, shoe moulding may be recommended.
Is MDF good for baseboards?
MDF is a common paint-grade baseboard material because it is smooth and stable. It works well in many dry interior rooms, but moisture-prone areas may need a different material choice.
Do baseboards need to be painted after installation?
Primed baseboards still need finish paint unless the product is already fully finished. Confirm whether the quote includes paint-ready prep only or final trim painting.
Can old baseboards be reused?
Sometimes, but it is not always worth it. Old trim can crack during removal, have paint build-up, or no longer fit after new flooring. Reuse is usually best for matching small sections, not full-room upgrades.
Do I need a permit for baseboard installation in Mississauga?
Simple trim replacement usually does not require a building permit. Larger renovation work may have different requirements, especially if structural, fire separation, plumbing, electrical, or condo rules are involved. Check the City of Mississauga guidance for the full project scope when unsure.
Related local pages and guides
Keep Planning Your Project
Baseboard installation in Mississauga
Local service page for baseboard installation, replacement, shoe moulding, and paint-ready finishing.
Baseboard installation and replacement service
Main EPF baseboard installation service page for GTA homeowners.
Interior painting services
Helpful when new baseboards need final paint, caulk lines, and wall touch-ups.
Drywall repair in Mississauga
Useful when old trim removal exposes torn drywall paper, wall damage, or damaged corners.
Drywall installation after renovation changes
Related renovation sequencing guide for walls, ceilings, and finish planning.
Request a baseboard installation quote
Send photos, room sizes, profile preference, and timing for a clearer quote.
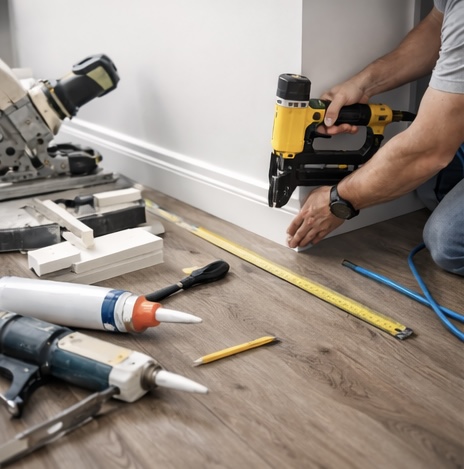
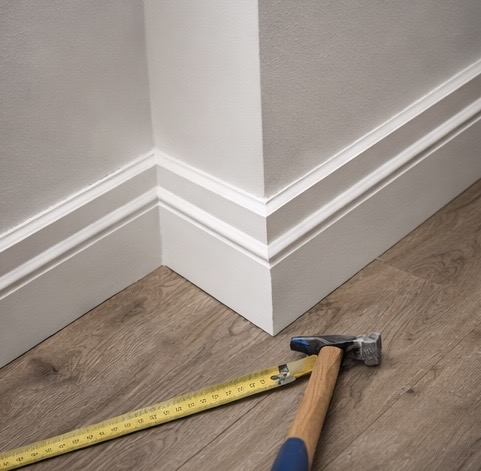
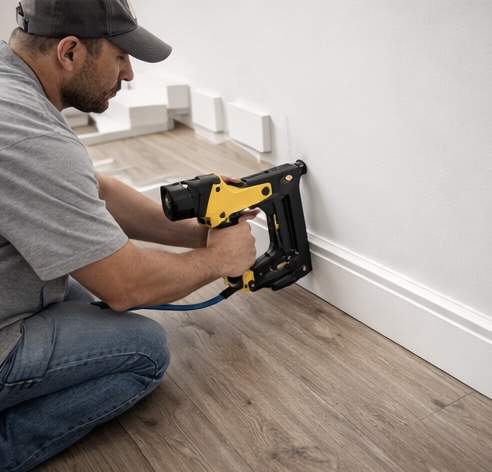
Field Photos
What the Work Can Look Like
Article Review
AuthorAlex - EPF Pro Services
Reviewed byEPF Pro Services
UpdatedJune 13, 2026
Plan your baseboard scope
Get a baseboard installation quote today
Share photos, room sizes, linear footage if you have it, profile preference, and timing. We reply with Mississauga baseboard installation availability and a clearer written scope.
Quick next step