7 Popcorn Ceiling Removal Mistakes That Make the Final Ceiling Look Worse
Updated June 3, 2026
A homeowner-friendly guide to the popcorn ceiling removal mistakes that make finished ceilings look worse, with practical advice on avoiding costly rework.
- Trusted since 2005
- Fully insured
- Dust-controlled sanding
- Paint-ready finishing
- 3-year workmanship warranty
Quick Answer
The most common popcorn ceiling removal mistakes are scraping without checking whether the texture is painted, skipping proper room protection, gouging the drywall paper, assuming scraping alone creates a smooth ceiling, rushing skim coat drying time, sanding without dust control, and painting before the ceiling is truly flat. These mistakes can turn a simple-looking project into a ceiling that shows waves, patch lines, stains, and rough texture under normal lighting.
Popcorn ceiling removal looks simple from a distance. Wet the texture, scrape it down, sand the ceiling, paint it white, and the room should feel updated. In real houses and condos, the ceiling underneath the texture is rarely that forgiving. The texture may be painted. The drywall seams may be uneven. Old repairs may be hidden. The ceiling may have roller ridges, water stains, pot light patches, or joint compound that was never finished beyond the level needed for texture.
That is why professional popcorn ceiling removal is not just a scraping job. The quality of the final ceiling depends on protection, removal method, repair work, skim coating, sanding control, primer, paint, and lighting checks.
This guide covers seven mistakes that make the final ceiling look worse, not better. Some are DIY mistakes. Some happen when a quote is based only on square footage and not the real ceiling condition. The goal is not to scare homeowners away from improving their ceiling. The goal is to show where the visible finish is won or lost.
Mistake 1: Scraping Before You Know Whether the Ceiling Is Painted
Unpainted popcorn often softens when it is misted with water. Painted popcorn behaves differently. Paint seals the texture, blocks moisture, and can make scraping unpredictable. Some areas may release in flakes while other areas stay bonded to the ceiling. When the texture has been painted more than once, it may not scrape cleanly at all.
Homeowners often discover this after one test patch turns into torn drywall paper, hard ridges, or a ceiling that looks worse than before. Once the paper face of the drywall is damaged, the ceiling needs sealing, repair compound, drying time, sanding, and usually a broader skim coat to make the damage disappear.
If you already know the ceiling is painted, read our guide to painted popcorn ceiling removal before choosing a scrape-only plan.
A proper test area matters. It shows whether scraping is realistic, whether the texture needs to be skimmed or encapsulated, and whether the ceiling has hidden patching beneath the texture. The test should be done carefully because a random aggressive scrape can create unnecessary damage before the project has even started.
Mistake 2: Protecting the Floor but Forgetting the Rest of the Room
Popcorn removal creates wet debris, fine dust, sanding residue, primer splatter risk, and paint overspray or roller drip risk depending on the finishing method. Covering the floor is only one part of protection. Furniture, walls, trim, doors, vents, closets, built-ins, smoke detectors, light fixtures, and return-air openings all need attention.
In condos, protection also includes hallway rules, elevator booking, material movement, garbage handling, and keeping shared areas clean. In houses, the concern is often dust migration between rooms, stairwells, open concept spaces, and HVAC returns. One poorly sealed area can make a clean ceiling project feel messy for days.
Good protection does not make the job slower in a wasteful way. It prevents cleanup problems, protects finished surfaces, and lets the ceiling work happen with less risk. If a quote is much cheaper because protection is vague, ask exactly what is covered, how dust is contained, and what cleanup is included.
Mistake 3: Gouging the Drywall Paper During Scraping
The top layer of drywall is paper. Once it is torn, fuzzy, or peeled, paint will not hide it. Primer can seal it, but the area still needs repair and feathering. A ceiling with hundreds of scrape marks can require much more skim coating than the original scope.
Gouging usually happens when the scraper angle is too steep, the texture is not soft enough, or the person scraping is trying to force painted texture to release. It can also happen around taped seams, ceiling corners, patches, skylights, bulkheads, and areas where previous compound is harder than the surrounding texture.
Small marks are normal in some removal projects. The mistake is pretending they do not matter. Every gouge that is visible after primer should be addressed before the finish coat. If the ceiling is painted too early, those marks become more obvious under daylight, pot lights, and low-angle evening light.
Mistake 4: Assuming Scraping Alone Creates a Smooth Ceiling
Scraping removes texture. It does not automatically create a flat, modern ceiling. Under the popcorn, many ceilings were never finished to a level that would look good painted flat. Builders often used texture because it hid seams, minor waves, fast taping, uneven compound, and framing movement.
That is why we wrote a dedicated guide on why scraping alone does not create a smooth ceiling. If the final goal is a clean flat finish, the scope usually needs repair, skim coat, sanding, primer, and paint.
This is one of the biggest expectation gaps. A homeowner may ask for popcorn removal, but what they actually want is a smooth ceiling. Those are connected services, but they are not the same thing. The quote should be based on the finished result, not just the texture removal step.
Mistake 5: Rushing Skim Coat Drying Time
Skim coat quality depends on thin, even passes and enough drying time. If compound is sanded too soon, it can tear, smear, clog sandpaper, or create uneven burnished areas. If the next coat goes on before the previous coat is ready, moisture can stay trapped and the ceiling can show waves or soft areas.
Drying time changes with humidity, temperature, compound thickness, ventilation, and how much repair work was needed. A bedroom can move faster than a large open concept main floor because smaller areas are easier to control and check. Painted popcorn ceilings often need more passes because the surface is less predictable after removal or encapsulation.
Rushing skim coat is tempting when a project has a move-in date or real estate deadline, but it usually creates the very defects homeowners are trying to avoid: visible trowel marks, ridges, patch shadows, and uneven sheen after paint.
Mistake 6: Sanding Without Dust Control
Sanding is where a ceiling starts to look refined, but it is also where a project can become messy fast. Drywall dust is fine, travels easily, and settles on ledges, furniture, vents, cabinets, and flooring. A dust-controlled sanding setup with HEPA extraction does not mean zero dust, but it greatly reduces dust movement and makes cleanup more predictable.
Poor sanding can also affect the finish. Over-sanding can expose drywall paper or create low spots. Under-sanding leaves ridges and tool marks. The best results come from controlled sanding, bright work lights, touch-up compound where needed, and another check before primer.
Mistake 7: Painting Before the Ceiling Is Ready
Paint is not a repair product. It makes many ceiling problems easier to see because it creates a continuous surface that catches light. Primer helps seal the surface and reveal defects. Finish paint should come after the ceiling has been checked, touched up, sanded again where needed, and inspected under lighting similar to how the room is used.
Ceilings with pot lights, large windows, patio doors, skylights, or long open sightlines need extra attention. Low-angle light will reveal waves that are not obvious from directly below. If the ceiling is painted before these checks, fixing defects may mean sanding and repainting larger sections.
How to Avoid These Problems Before the Job Starts
Start with clear project information. Measure the room or total square footage. Note the ceiling height. Take photos in daylight and with lights on. Tell the contractor if the popcorn is painted, if there were past leaks, if pot lights are being added, and whether the home is a condo or house. If you want a flat modern ceiling, say that directly instead of asking only for removal.
For GTA homeowners comparing budget and scope, our 2026 GTA popcorn ceiling removal cost guide explains why painted texture, repairs, high ceilings, and finish level change pricing.
A good ceiling quote should explain what is included, what is not included, how the room will be protected, whether the scope includes skim coat, whether primer and paint are included, and what happens if the texture is painted or the drywall underneath is damaged. The more specific the scope, the fewer surprises later.
What a Better Popcorn Ceiling Quote Should Clarify
A stronger quote does not need to be complicated, but it should be clear. It should separate the removal method from the finish result. For example, scraping unpainted texture is not the same scope as painted popcorn encapsulation with a full skim coat and flat ceiling paint. Both may be described as popcorn ceiling removal, but the labour, drying time, materials, and finished appearance are different.
The quote should also explain whether furniture moving is included, whether walls and floors are protected, whether light fixtures need to be removed, whether pot light holes or old fixture marks are repaired, and whether cleanup includes debris removal. If primer and paint are included, the quote should say so. If electrical work, asbestos testing, water damage repair, or major drywall replacement is excluded, that should also be clear before work starts.
This matters because the cheapest written number can become the most expensive project if the scope is incomplete. A homeowner may think they bought a smooth ceiling, then discover the price covered only scrape-down removal. At that point, the room is already disrupted and the ceiling still needs repair, sanding, primer, and paint.
Condo and House Mistakes Are Different
In a condo, the mistakes are often logistical. Elevator booking, parking, hallway protection, garbage removal, noise windows, and dust containment all affect the project. If these details are ignored, the work can become stressful even when the ceiling itself is manageable. Condo ceilings can also have concrete, bulkheads, sprinkler heads, and limited access conditions that change the work plan.
In a house, the risk is often scale. A main floor may connect the kitchen, dining room, hallway, and living room with no easy stopping point. Dust can travel through open stairwells and returns. Large windows and pot lights can reveal waves across a much wider ceiling. The mistake is treating a 1,000 sq ft open concept ceiling like a small isolated bedroom.
The best scope reflects the property type. A condo plan should be tight on access and protection. A house plan should be strong on containment, room sequencing, and finish checks across larger sightlines.
When to Stop and Reassess During DIY Removal
If the ceiling starts tearing, stop. If the texture will not soften, stop. If the drywall paper becomes fuzzy, stop. If you find staining, loose tape, mold concern, or possible asbestos risk, stop and reassess before continuing. Pressing ahead can turn a manageable repair into a full ceiling rescue.
A small test area is useful only if you respond to what it tells you. If the test shows painted texture, poor adhesion, heavy gouging, or hidden damage, the scope needs to change. That does not always mean the project is impossible. It means the ceiling likely needs a finish plan, not just more scraping pressure.
Final CTA
Send photos of the ceiling, room size, ceiling height, and whether the popcorn is painted. We can tell you what type of finish scope makes sense.
FAQ
What is the biggest popcorn ceiling removal mistake?
The biggest mistake is assuming scraping alone will create a smooth ceiling. Scraping removes texture, but the ceiling underneath usually still needs repairs, skim coating, sanding, primer, and paint to look flat.
Can painted popcorn ceiling be scraped?
Sometimes, but painted texture often does not scrape cleanly because paint seals the surface. A test area helps determine whether scraping, encapsulation, skim coating, or a combined approach is best.
Why does my ceiling look worse after popcorn removal?
The ceiling may show gouges, drywall seams, old repairs, waves, or torn paper after texture is removed. These defects need proper repair and finishing before primer and paint.
Related local pages and guides
Keep Planning Your Project
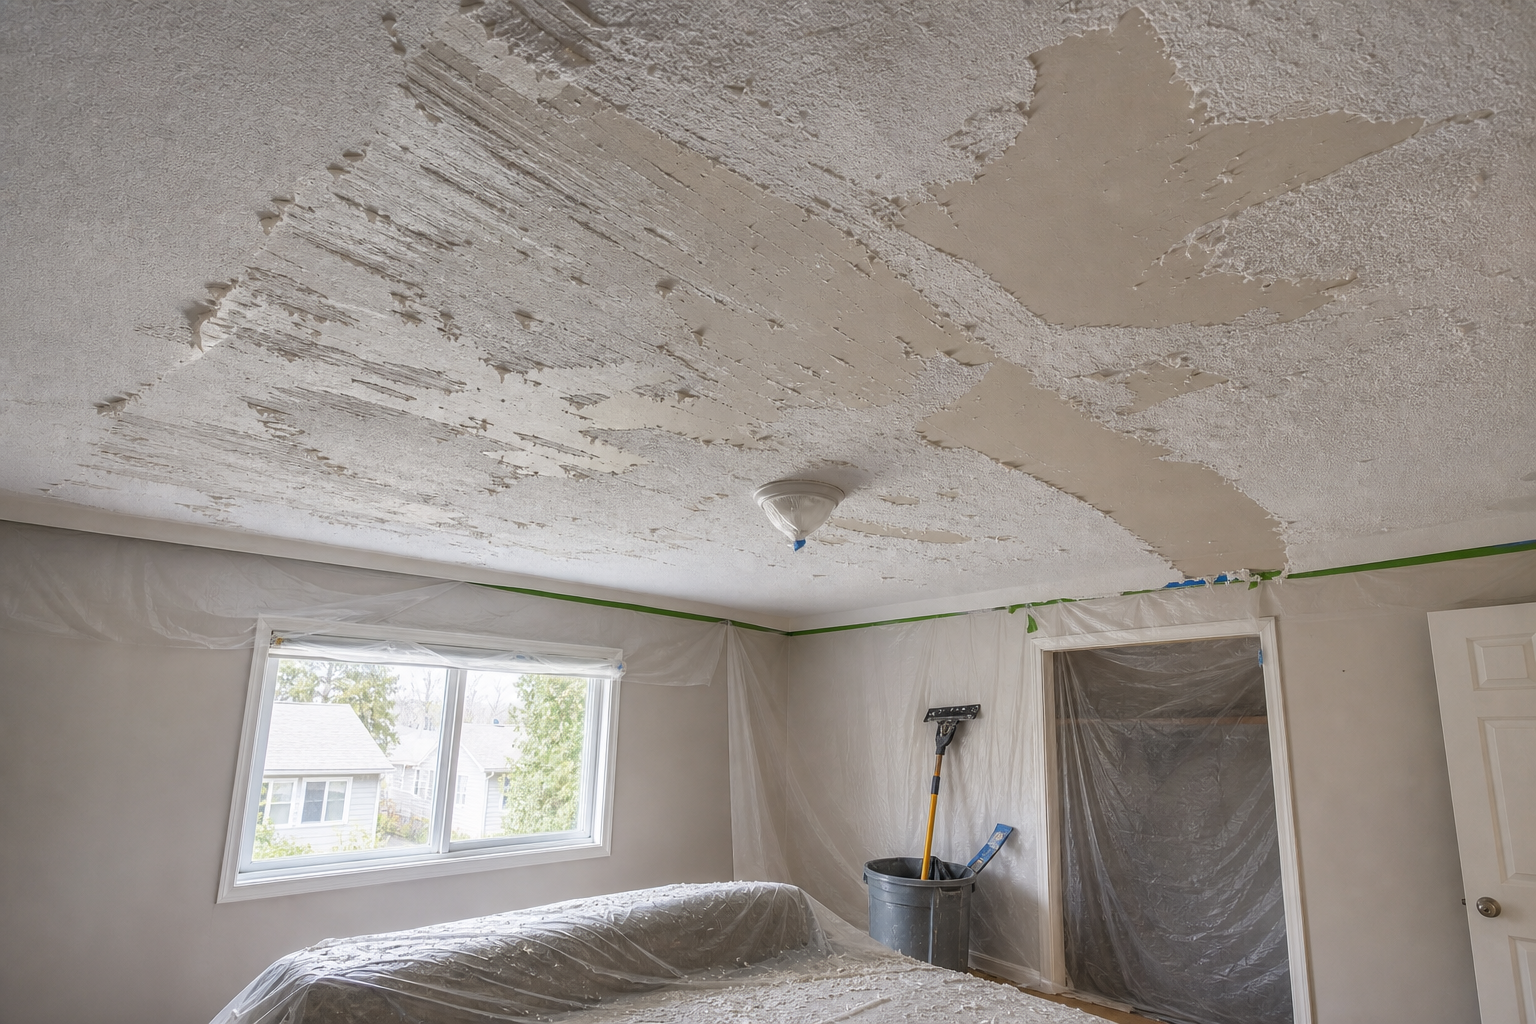
Field Photos
What the Work Can Look Like
Article Review
AuthorEPF Pro Services
Reviewed byEPF Pro Services
UpdatedJune 3, 2026
Ready to plan your ceilings?
Get a popcorn ceiling quote today
Share photos, ceiling heights, and timing. We reply the same day with Mississauga, Oakville, and GTA availability.
Quick next step