Project Notes: Ceiling Rebuild After Leak in Oakville
2026-03-16
Oakville project notes from a ceiling rebuild after a leak, including removal boundaries, drying, replacement, stain control, and final finish quality.
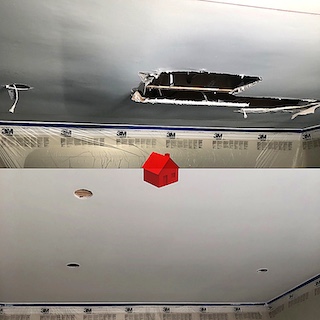
This Oakville project started with a second-floor plumbing leak that travelled farther than the visible stain suggested. From the room, it looked like one damaged patch. Once the ceiling was opened, the affected area ran wider along the bay between fixtures, which is common when water moves sideways before it finally shows.
What the homeowner needed
- Clear removal boundaries
- Confidence that the cavity was dry before closing
- A clean tie-in to the existing ceiling so the repair did not read like a patch
- A written scope that made sense for insurance conversations
What happened first
We widened the opening enough to remove compromised material cleanly instead of trying to save soft edges. The cavity was dried and checked before new board went in. That added a little time up front but prevented the more expensive mistake, which would have been finishing over damp material.
The part people underestimate
The finish tie-in. Leak repairs are not hard because of the board alone. They are hard because the new work has to disappear into the old ceiling plane. Fixture cutouts, old texture, prior patchwork, and lighting direction all affect how forgiving that blend will be.
Why the final result worked
We did not try to keep the opening artificially small. We replaced enough material to rebuild a stable surface, sealed what needed sealing, and finished the repaired plane to the standard the room required. That gave the painter a straightforward surface instead of a repair that still needed excuses.
Takeaway
Leak-driven drywall work is better when it is treated like a rebuild, not a cosmetic patch. The room ends sooner, and the result lasts longer.
Related local pages
Drywall installation after water damage Mississauga — Guide page explaining how replacement should be sequenced after a leak.
Drywall installation service hub — Main service page for replacement, finishing, and paint-ready handoff.
Request a drywall quote — Send photos of the stain, the room, and the source area for a tighter scope.
Field photos
Inspiration for your project


Drywall terms this page covers
Useful terms to compare scopes, finish levels, and scheduling before you book.
- ceiling rebuild after leak Oakville project
- Oakville water damage ceiling drywall project
- ceiling drywall replacement Oakville
- drywall replacement after leak Oakville
- Oakville ceiling water damage project
Plan your drywall scope
Get a drywall quote today
Share photos, room sizes, and a short note about your Oakville drywall scope. We reply the same day with availability and a cleaner written scope.
• Clear finish-level scope and drywall sequencing
• Basements, ceilings, condos, and commercial buildouts
• Flexible scheduling for occupied homes, condos, and active sites
Quick next step
Send photos and room sizes through the main quote page, or call for a same-day reply.
Keeping the form on the main quote page helps this article stay lighter and faster.